The Tape Ahead
Before you place a single spread, you check this. Binary events gap stocks straight through your strikes — earnings, the Fed, inflation prints, the jobs report. They don't care how clean your setup looks. This page is your pre-flight: what's scheduled this week, color-coded by how much it can move your trades. It updates itself — the week below is always the current one.
Why You Check This First
Your indicators read normal tape. They can't see a calendar. A bull put spread can be a textbook A+ setup and still get blown through if CPI prints hot the next morning or the company reports earnings that night. The job of this page is to tell you when the tape won't be normal — so you either shorten your expiry, size down, or simply stand aside. Most account-killing losses aren't bad setups; they're good setups placed in front of a scheduled event nobody checked for. This is the five-second habit that prevents them.
How To Read Each Part
Everything on the live page is built to answer one question: "Is anything scheduled that can move my trade more than my setup expects?" Here's how to interpret each piece.
| What you see | What it's telling you | How to act on it |
|---|---|---|
| Desk Read (the one-liner) | Risk-on / risk-off, breadth (% of the watchlist green), the VIX, and the VIX term structure (spot vs. 3-month) in one glance. | Risk-off + high VIX = tighten up, smaller size, favor premium selling. Risk-on + calm VIX = your setups have more room to work. Term structure in contango = calm, normal premium-selling tape; backwardation = a stress regime — cut size everywhere, even on A+ setups. |
| Market Overview | Indices, the VIX, the 10-year yield, the dollar, oil and gold. The market's weather. | A spiking VIX or yield is a regime change — don't fight it with the same size you used in a calm tape. |
| Sectors | Which S&P sectors are leading and lagging today. | Trade with the rotation. A bullish name in a red sector is swimming upstream; favor names in green sectors. |
| Movers / 52-wk Extremes | The biggest moves and the names pinned at their highs or lows. | These are where exhaustion lives — exactly what the HM5 Spread System hunts. A name slammed to a 52-wk low and stabilizing is a put-spread candidate. |
| This Week's Calendar (below) | The Fed, CPI, Jobs, PPI, OPEX, and which of your names report — color-coded by impact. | Green day = clear to open. Red day = a gap risk is scheduled — don't sell a new spread that expires after it. |
| Earnings | Watchlist names reporting in the next several days. | Never hold a short premium spread through earnings. Close it, or don't open one that spans the date. |
| News Tape | The latest market headlines, newest first. | Context, not a trigger. If a name you're in is in the headlines, go find out why before you do anything. |
| HM5 Watchlist Heat Map | All 142 watchlist names, sorted strongest to weakest by today's move. | A glance at where momentum and pressure already are. Pair it with your chart — it never replaces the read. |
| How To Trade (first tab in the Trade Radar group) | The methodology, read once: the 142-name HM5 Universe, what each of the six boards below actually is, how to read a Vertical Spreads row, the Skip-This-Spread checklist, the full setup-tag legend, and how Hou5e Wins works. | Read it the first time you visit. Every other tab in the group — Vertical Spreads, Options Flow, Condors, Share Setups, Small-Cap Movers, Futures Setups — now jumps straight to its trade list instead of scrolling past this material each time. |
| Desk Confluence (its own tab, right after How To Trade) | The shortest list on the page — names showing up on 2 or more independent boards in the same direction (Vertical Spreads, Options Flow, Analyst upgrades/downgrades, Insider buys/sells, Congress trades, Squeeze Watch). | The highest-conviction names on the entire tape, because separate systems agree without knowing about each other. Still not a command to trade — it just tells you where to spend your scrutiny first. |
| Vertical Spreads | The HM5 scanner's directional two-leg option ideas — bull call / bear put (debits) and bull put / bear call (credits). Weekly (swing/spread shortlist), Daily (the faster list), and an Entry tab that times your entry on those picks. Each row carries a suggested structure, strikes, DTE and premium. Its own Hou5e Wins list sits directly below it (see below). | "Look here," never "act here." Run every idea through the Skip-This-Spread checklist and confirm on your own chart. Earnings-flagged names: sit out. |
| Options Flow | Real option-market activity across the universe: where the big call/put money is actually going today, with an UNUSUAL tag when fresh size shows up, a board-count pill naming how many other boards are seeing the same name in the same direction (it reads ONLY HERE when none are), and an IVR pill once enough history has built up (a real, self-tracked Implied Volatility Rank for that name). Its own Hou5e Wins list sits directly below it (see below). | Higher risk than the rest of the desk — these are raw flow reads, not HM5 Tradedesk-confirmed setups. Flow can be hedging — treat flow-only rows as context. The A+ read is UNUSUAL plus a live board-count pill: real money and a real chart setup agreeing. Earnings-flagged rows: assume it's earnings positioning. Size down and confirm the chart yourself before acting. |
| Naked Trades | The small-account board. One contract, one leg — a plain long call or long put, $500 or less, and that premium is the entire risk. It reads every directional board on the page and keeps only the names where a cheap, tight-market contract can pay a quick, small gain on a move the stock makes in about a day — and when all five pillars are firing, it holds for a bigger one. Every card carries its own exit rather than a house number, because a cheap contract on a quiet name and a pricier one on a fast name need very different moves. Its own Hou5e Wins list sits below it, measured against each idea's own required move. | A long option decays every day you hold it — it can reach zero even when the direction was right. Take the target on the card, cut the loser the same distance, and be out by the time stop. We recommend never holding one past +25%. The method only works if the losers stay small. |
| Condors | The chop trade — the only neutral board on the page. Two structures, both four-leg and both defined-risk: an Iron Condor (short strikes a full expected move either side — wider zone, smaller credit) and an Iron Butterfly (short strikes at the money — tighter zone, much bigger credit). You collect premium up front and keep it if the stock simply sits still. A name only prints here if implied volatility is rich (IVR 50+), its daily range is contracting, price is sitting mid-range, RSI is 40–60, and there are no earnings before expiration. It is also excluded outright if it's currently on Vertical Spreads or Options Flow — those two boards are the breakout list, and a breakout is the one thing that breaks a condor. Exit is mechanical: bank ~25% of the credit. Its Hou5e Wins list is measured differently to every other board — see below. | An empty Condors board is normal and healthy: it means the tape is trending and the desk is finding directional trades instead. Close it if price trades through a short strike — don't wait and hope it comes back. |
| Share Setups | The same engine, translated for share traders — entry zone, stop and target on flow-confirmed names. | The stop is the invalidation. If you won't honor it, don't take the entry. |
| Hou5e Wins (under each Trade Radar board) | Directly below each trade-idea board, a running list of the names from that board where the stock made the move the desk called, with the entry price and the day it first printed. It says the desk was right about the move; it is not a statement about any one person’s trade. The take-profit on each ticket is what the HM5 desk recommends; your profit target is yours to set. Range trades (condors and butterflies) land here when the stock stays inside its range for the full window. | Read it as the desk’s scoreboard, not as your own result. A name can print again later as a fresh idea, so check the entry price shown against today’s before you size into it. |
| Small-Cap Movers | Today's liquid small/mid-cap gainers, split into Long (still breaking out, no exhaustion sign yet) and Short (already stretched a long way — an RSI-based exhaustion/fade read) columns. Still gappers, not chart setups — no formal entry/stop/target either way. We track how far each one runs from its first-seen price (see Hou5e Wins above). | Highest-risk list on the page. Research first, size small, mind the spread — the Short side is a fade-risk read, not a shorting recommendation. |
| Futures Setups | Share Setups' engine — entry zone, stop and target — run against the top 10 CME Micro futures (MES, MNQ, MYM, M2K, MGC, SIL, MHG, MCL, MNG, MBT), each read off its own real CME continuous futures ticker (e.g. MES ← ES=F) — a Micro and its E-mini/full-size counterpart trade at the same price level, so these are real futures numbers, not an equity-ETF stand-in. Grade only reaches CONFLUENCE when a second desk check agrees: the other three equity-index micros for MES/MNQ/MYM/M2K, or gold-vs-silver agreement for MGC/SIL — otherwise it's capped at CONFIRMED, not hidden. A session chip shows whether that contract's own near-24/5 CME Globex session is open, on its daily maintenance halt, or closed for the weekend. Its own Hou5e Wins list sits directly below it. | High-risk, fast-moving contracts — size down and confirm your own fills. Treat a CLOSED session chip as "not tradeable right now," even though the card itself keeps showing the last computed setup. Paper trading only — not financial advice. |
| Institutional & Alt Data (Futures Bias, Analysts, Insiders, Congress, Big Money, Squeeze & Gamma) | What futures, Wall Street, insiders and the options market are positioned for. | Context that tilts conviction up or down — never a standalone entry trigger. |
Earnings This Week
On Deck — Next Week
Clear Windows — Best Days to Open
Green = no market-wide event that day, safe to open spreads. Red = a gap risk is scheduled.
Days to Expiry + EM Multiplier
Your expiry Fridays ahead, with the √DTE multiplier for your Expected Move line: price + (EXP × multiplier). See the Expected Move tab.
This Week's Game Plan
The pre-flight before any spread. Tap to check off.
HM5 Watchlist Heat Map — Who's Moving Today
A snapshot of the whole HM5 watchlist, sorted strongest to weakest by the day's move. Green = up, red = down. It's a glance at where momentum and pressure already are — pair it with your stack before acting. (Snapshot from the latest close — a picture of the tape, not a live ticker.)
How To Read It — The Events That Move Your Spreads
Each event is a scheduled moment where price can jump more than a normal day allows. Some hit the whole market (every ticker gaps together); some hit one name. Here's what each one is and what to do with it.
| Event | What It Is | Who It Hits | The Play |
|---|---|---|---|
| FOMC | The Fed's interest-rate decision, 8× a year. The 2pm statement + press conference move everything. | Whole market | No new spreads expiring after it. Flat or shorten DTE into the print. |
| CPI | Monthly inflation report, 8:30am. The single biggest scheduled market mover most months. | Whole market | Same — don't be short premium across it unless DTE is tiny and managed. |
| JOBS | Monthly employment report (NFP), first Friday-ish, 8:30am. Big open-gap risk. | Whole market | Avoid Thursday-expiry spreads that bleed into Friday's gap. |
| PPI | Producer inflation, near CPI week. Smaller than CPI but still a market mover. | Whole market | Treat like a lighter CPI. Respect it if your spread is thin. |
| OPEX | Monthly options expiration (3rd Friday). Quad witching in Mar/Jun/Sep/Dec = extra volume + pinning. | Whole market | Expect choppy pinning into the close. Not a gap, but manage open positions. |
| EARNINGS | A single company reports. The stock can gap 5–15%+ overnight regardless of trend. | One name | Never hold a credit spread on that name through the report. Wait for the IV crush after. |
Why Red Beats Your Read
Your stack (TREND, FLOW, TIDE) is built to read normal tape — orderly buying and selling. A binary event isn't normal tape; it's a coin flip resolved in one candle. A stock in a clean downtrend can still gap up 10% on a good earnings print. That's why a red event overrides even an A+ setup: you're no longer trading the trend, you're betting on a number you don't know. The desk doesn't make that bet with defined-premium trades.
Hou5eMoney
Shares, options, spreads & futures — read once, trade with precision
A simple plan for deciding when to buy shares, sell premium, buy spreads,
trade the micros, short the tape, and when to stand aside.
The HM5 Credit Spread System
This is the simplest expression of the entire five-indicator stack. No predicting tops. No catching bottoms. You wait for a stock to exhaust itself at an extreme, confirm the move with real order flow, then sell a defined-risk spread and let time and volatility do the work. Five indicators. Five steps. Set and forget.
What You Are Actually Doing
You sell a vertical credit spread in the direction the stock has stopped moving. When a name is deeply overbought and rolling over, you sell a call spread above it. When a name is deeply oversold and turning up, you sell a put spread below it. You collect a credit up front, immediately set a good-til-canceled buy-to-close order that targets a 25% profit, and walk away.
Put Spread — sell into a turn UP
Stock is oversold and bouncing. You sell a put spread below price. You profit if it stays above your short strike.
Call Spread — sell into a roll DOWN
Stock is overbought and rolling over. You sell a call spread above price. You profit if it stays below your short strike.
Why This Actually Works — in plain English
You don't have to take our word for it. Three forces stack in your favor the moment you place the trade — and none of them require you to guess direction correctly:
① Probability is on your side
You place your strike beyond where the stock is statistically likely to travel (that's the Expected Move — its own tab). The stock has to make a bigger-than-normal move just to threaten you. You're not betting it goes your way — you're betting it doesn't do something unusual. That's the easier bet, by a wide margin.
② Time pays you every day
An option is a melting ice cube. Every day that passes, the premium you sold loses value — and that decay flows into your pocket whether the stock goes up, down, or nowhere. You are the house collecting rent. We enter around the window where that decay is richest and the math is most in your favor.
③ You only take a small bite
We don't wait for the trade to go to zero. We grab roughly the first 25% of the credit and walk — then reset. Small, fast, repeatable. Sell a spread for $1, buy it back at 75¢, keep the 25¢. Boring on purpose. Do it again tomorrow.
Where to Run It — The Timeframe Stack
This is the part most people get backwards. You read the big picture to choose the trade, then drop to a faster chart only to time the entry. Top down. Always.
| Stack | Credit spread | Debit spread | Naked long |
|---|---|---|---|
| A+ · 5/5 | Bank 50% of max | Aim for 50% of max | Up to +50% — only if the move fits ~3 average days |
| A · 4/5 | Bank 35% of max | Aim for 35% of max | Up to +35% — only if the move fits ~2½ average days |
| B · 3/5 | Bank 25% of max | Aim for 25% of max | The small bite on the card (+10 to +25%) |
| C · 2/5 or less | No trade. Watch it, don’t size it. | ||
- Pick the expiry around ~24 days out (or wherever the theta — the daily decay — is richest). Far enough that time isn't rushed, close enough that decay is working hard for you.
- Enter on a 1H or 4H Confluence trigger in the direction your Weekly/Daily read already chose. The higher timeframe is the boss; the lower timeframe is just when you walk in the door.
- Set your buy-to-close at 25% the moment you fill. Then walk away. The order does the work. In a choppy, headline-driven market, taking the small bite fast beats reaching for the last dollar every time.
The 5-Step Check
A name fired on a scanner. Now you decide. Walk these five steps top to bottom. Every step must pass. The moment one fails, you skip the name and move to the next — no negotiating with a setup that is already broken.
Structuring the Spread
All five steps passed. Now you build the trade on the options chain. Here is exactly what a clean put-spread entry looks like — and the four numbers that have to be right before you click Send.
📋 What This Order Means — Bull Put Spread on EBAY
🔁 How To Close — Buy To Close, Not Sell To Close
A credit spread is opened by selling (you collect money up front), so it is closed by buying it back. You are net short the spread — the closing order is always BUY TO CLOSE, never sell to close. Selling again would open a second position, not close the first.
What To Skip — No Exceptions
Most losses are not bad entries — they are trades that should never have been taken. These three conditions are instant skips. You do not read the rest of the chart. You do not "see if it works out." You move to the next name.
① ATR% above 6%
Check PULSE first. If daily ATR% > 6% the stock moves too fast to keep out of your strikes for 21–28 days. High IV that comes from a wild chart is risk, not easy premium. Skip on the first label.
② Weekly TIDE conflicts
If weekly TIDE disagrees with your trigger — BUY 60%+ while you want a call spread, or SELL 60%+ while you want a put spread — you are fighting the tape. Never trade against the weekly.
③ No 21–28 DTE on the chain
Some names jump from a 16-day weekly straight to a 45-day monthly. If there is no expiry in your 21–28 day window, the trade does not exist for this system. Skip — do not force a bad expiry.
Leveraged & inverse ETFs
SOXS, SQQQ, TQQQ, UVXY, SPXU and the like decay by design and carry 100%+ ATR. They also break the GRID scale on charts. Keep an EXCLUDE watchlist on the scanner so they never appear.
Premium too thin
If the best 80–85% Prob OTM strike pays less than $0.50 per $1 of width, the trade is not worth the risk. Do not move strikes closer to the money to manufacture credit. Skip.
The Spread Trader's Day
This is a set-and-forget income strategy, not a screen-staring one. The entire active workload is a focused window in the morning. After your orders are in with their GTC exits attached, the correct action for the rest of the day is to leave them alone. (Trading shares, the wheel, or active options too? The full hour-by-hour session schedule lives in Schedule & Rules.)
- Run your spread-system scans to build the candidate list — Weekly and Daily, both directions.
- Write down every name. Star any name that appears on both Week and Day — those are your A+ candidates.
- On each candidate, check Step 1 — weekly TIDE. BUY 60%+ = puts only. SELL 60%+ = calls only. Neither = drop the name.
- Let the open settle — do not chase the first 15 minutes of noise.
- On the names that survived the weekly filter, run Steps 2–5: TRIGGER confluence, FLOW + TIDE daily, PULSE (ATR%, IVR, IV), then the chain.
- Any step fails → skip and move on. No exceptions.
- SELL TO OPEN the spread at the mid. The instant it fills, set a GTC BUY TO CLOSE at 75% of the credit (sold for $1.00 → close at $0.75) to bank 25% profit.
- That is the trade. Theta and IV crush do the rest over the coming days.
- Your exits are already working as GTC orders. Let them fill on their own.
- No re-checking, no second-guessing, no adding risk into a quiet tape.
Welcome to the Playbook
First, plainly: this is not financial advice. The Playbook teaches you to read the desk’s chart and boards across everything you might trade: long shares, short shares, and options from a cash-secured put to a vertical spread. Five indicators speak one color language. Together they tell you what the market is doing now and what kind of trade, if any, that calls for. What you do with that read is your decision and your risk.
The desk is a system, not a prediction. Whether the trade is 100 shares on a Buy Dip arrow or a defined-risk spread, the read is the same. Direction comes from Trigger and Grid. Strength comes from Pulse. Confirmation comes from Flow. Size comes from Tide. Your job is to match the right trade to the read, size it so a loss does not matter, and take the exit you planned.
How The Desk Thinks
Nobody can reliably call the exact top or bottom of a move. Anyone who says they can is guessing. So the desk does not try. It waits for the trend, waits for a trigger in the trend’s direction, and takes a planned piece of the move.
The desk calls that taking small bites. A target the market can reach in a few ordinary days gets reached more often than a big one, and a small loss taken at a planned stop leaves you in the game. Most trades here are built so the most you can lose is known before you enter. None of this makes a trade safe, and no method wins every time. It makes the outcome something you decided in advance.
🌱 If you are brand new
You do not need a finance degree or a big account. You need a process you can repeat, and the patience to practice it with paper money first. Every word is defined the first time it appears. Start with the Start Here course, then come back here for the full chapters.
⚡ If you already trade
You know that guessing direction does not last. What this gives you is a mechanical, defined-risk routine you can run each morning in about ten minutes, and a score that tells you honestly whether you followed it.
How to Use This Playbook
The chapters build on each other, top to bottom, and each one ends with a Next up → button that takes you to the next. Each chapter also opens with the course that teaches the same thing in short lessons. If you are not sure where something is on the site, read Find Your Way Around first.
🌱 Brand new to trading
Start at the top and follow every Next up → button in order. Each chapter assumes the one before it. Take your time on 5 Indicators (the language) and Options Basics (the vocabulary). By the HM5 Spread System the pieces will fit.
⚡ Already trade
Skim 5 Indicators for the color language, then go to the HM5 Spread System, The Tape Ahead and Scanners & Setups. Shares, the Wheel and the credit and debit mechanics are reference for when a setup calls for them.
Your Roadmap
The whole journey, in order. Tap any step to jump straight there.
Your Toolkit
The Playbook is one part of the site. Each part has one job, and they are meant to be used together. The chapter Find Your Way Around maps all of it.
🎓 The Courses
Six free courses in short lessons with a coach. Start Here teaches the whole desk; Options, Chart reading, Futures, Crypto and Long-term investing go deep on one subject.
📘 The Playbook
This guide: the full system in depth. The courses teach an idea in a minute; the Playbook is where you read the whole chapter.
📡 The Tape
The live boards: the morning read, trade ideas that print only after a trigger, and what the big money is doing.
🖥️ The Desk
Your paper account, laid out like a broker’s: open trades, the order ticket, your Discipline Rating, the Log and the Journal.
🎯 Play
A real chart stopped at a real moment. Call it buy, sell or pass, then see what happened. Ten a night builds the read.
👁 On Watch
What companies had to tell the SEC this two weeks, in plain English, with the filing one tap away.
How to Use the Desk
- Open the Desk from the top menu (the tab is on every page).
- Paper trades log themselves the moment they close — ticker, structure, fills, exit and P&L arrive from the desk. Add your notes, the trigger that fired and whether you followed the rules. Log by hand only the trades you place somewhere else. Win or loss — log it honestly.
- Each week, review: which triggers win for you, which ones you fumbled, where you broke a rule. That review is how a beginner turns into a consistent trader.
Pair your Journal with your paper trading to build hard proof of how the system behaves — as a learning exercise. This is for paper (simulated) trading and education only, never a recommendation to trade real money.
Paper-Trade Only
Run the Tradedesk in a paper (simulated) account — this is a practice and learning tool only, never a recommendation to trade real money. Trading is a form of gambling; never risk what you can't afford to lose. Log every practice spread, wheel assignment, win, loss and broken rule.
Mechanical, Not Magical
Every trigger is drawn by a script — not a hunch. If the colors disagree, you stand aside. Cash is a position. No trade is also a trade.
Every Contract Has an Exit
If the trend flips or the Exit Dot fires, you close or roll. No exceptions. Define your max loss before you enter. Options can go to zero. Plan for it.
The Hou5eMoney Creed
Read it once. Then read it before every session.
« Trade the plan. Let the colors guide you. Your only job is to obey them. »
Let's Go to Work
If you took a job, you'd learn how to do it. The Tradedesk is no different — you'll get out of this system exactly what you put into it. Show up, run the routine, follow the rules. Hou5eMoney does not predict the future. It does one thing well: it shows you, in plain colors, what the market is actually doing right now so you can stop guessing and start reacting — then pick the right options structure to express that read.
The Whole System in Three Sentences
- Look at the TREND labels. If they say BULL on all five indicators, you sell puts, buy call spreads, or run the wheel long-side. If they say BEAR, you sell calls or buy put spreads. If anything says CHOP, you do nothing.
- Check IVR on the Pulse dashboard. IVR above 50% = sell premium (credit spreads, CSPs, covered calls). IVR below 30% = buy premium (debit spreads, defined-risk directional plays). The number tells you the structure. The color tells you the direction.
- Exit when the trigger reverses. When the purple Exit Dot appears, the trend flips, or the CVD trend rolls against your position — close for a credit, roll to a later expiry, or cut the loss. Never let a defined-risk spread become an undefined-risk position by removing a leg.
That's the entire job.
The Multi-Timeframe System
Every timeframe has a different job. Stack them and you stop guessing — you read it. All five live on one strip at the top of the chart, each pill painted with that timeframe’s own trend, and clicking one switches the chart to it.
Five green, one gray — and the white ring marks the one you are charting. That is the multi-timeframe read in a single glance: agreement across the stack, with the weekly currently on screen.
| Timeframe | Its job | What you are asking |
|---|---|---|
| W — Weekly | Market direction | Where is the macro money leaning? Is this name in a trend at all? Start here — it is the default for a reason. |
| D — Daily | Trend bias | Is the trend healthy? Is there structure to sell premium against? |
| 4H | Setup engine | Is momentum accelerating? Is Flow confirming the direction? |
| 1H | Timing & expansion | Is a squeeze firing? Is volatility expanding into an entry? |
| 15M | Entry refinement | Has the pullback finished? Am I buying into strength or into a falling knife? |
| 5M and 1M | Timing, live | Candles are live: the market’s consolidated feed for history, a real-time exchange feed for the newest minutes, or your own tastytrade stream when it is connected. The 15-minute chart is still where the desk reads an entry; the minute charts are for timing it. |
Paper Trade Only. No Exceptions.
⚠️ FOR PAPER TRADING & EDUCATION ONLY ⚠️
Options trading has two separate skill sets. First: reading the Tradedesk correctly. Second: executing the actual trade without mechanical errors. In a paper (simulated) account you practice both at zero cost. This platform is for paper trading and education only — nothing here is a recommendation to trade real money, and trading is a form of gambling: never risk what you can't afford to lose.
What Can Go Wrong in Execution
- Selling the wrong leg first (orphaned naked short)
- Wrong expiry — selling a 2 DTE when you meant 21 DTE
- Wrong quantity — 10 contracts instead of 1
- Buying when you meant to sell (or vice versa)
- Market order instead of limit order
- Forgetting the protective long leg entirely
What Happens When You Do
- Naked short = unlimited loss potential
- 2 DTE spread expires worthless in 48 hours
- 10 contracts = 10× the capital at risk
- Wrong direction = immediate max loss
- Market order = terrible fill, wide slippage
- One-legged spread = uncapped assignment risk
Where You Practice
Every idea on this site can be taken as a paper trade — simulated money, real prices, on the same screen as the idea itself. The account opens the first time you visit it and logs every fill for you, so the journal keeps itself.
The Five Indicators at a Glance
Five scripts. One color language. One trend brain. When their dashboards agree you have a confirmed setup — when they disagree, sit on your hands and let your existing spreads collect theta.
Upper · Price
TRIGGER
Paints candles, draws EMA stack, fires entry arrows, drops Exit Dots. The options entry trigger.
Lower · Strength
PULSE
–100 to +100 strength meter. IVR / IV / EXP / ATR% pills. Decides your spread structure.
Lower · Order Flow
FLOW
Per-bar CVD. Confirms real buying vs. fake moves. Protects you from entering a spread into a trap.
Upper · Structure
GRID
Three nested channels. Dashboard shows BUY / HOLDING BULL / EXIT / WAIT. HOLDING BULL = stay in the spread. WAIT = no new entries.
Lower · Volume
TIDE
Weekly institutional volume vs. 30-week average. TREND BULL SURGE / a yellow VOL pill (≥200%) = size up. Thin gray VOL = go small.
The Color Language
Every trigger is encoded by color. All five indicators share the same palette. Learn the color once — read it everywhere.
How to Use Each Indicator
Each indicator answers one question. You read them in order — direction first, then confirmation, then size. Here is the job of each one and exactly what its trigger looks like on the chart.
| Indicator | The Question It Answers | What the Trigger Looks Like |
|---|---|---|
| TRIGGER Upper · on price |
"Do I take the trade — and which way?" | Colored candles + three EMAs (cyan fast, yellow mid, gray slow). Arrows fire entries: yellow BREAKOUT, lime BUY DIP, gold RECLAIM BUY, cyan CONFLUENCE BUY, cyan TRAP LONG (up); orange BREAKDOWN, pink SELL RIP, purple RECLAIM SELL, orange CONFLUENCE SELL, red TRAP SHORT (down). Dots: purple EXIT-LONG above a candle, green EXIT-SHORT below. It also now prints the FLOW divergence dots — cyan below the candle (bull), red above (bear). |
| FLOW Lower · order flow |
"Is the move real, or a trap?" | Per-bar delta histogram + CVD trend. Green/mint bars = buyers winning; magenta/lavender = sellers. Yellow/orange bars = acceleration. Divergence dots: cyan dot at the pane bottom = bull divergence (price made a lower low, CVD didn't); red dot at the pane top = bear divergence. Bright = confirmed by this bar's delta; faint = forming, not confirmed yet. These dots sit at the same bar as the ones now on the TRIGGER price chart above, and they lead the entry — a bull dot prints 1-2 bars before the BUY arrow, a bear dot before the SELL. |
| PULSE Lower · strength |
"How strong is this move?" | One histogram bar, –100 to +100, colored by regime: bright green strong bull, mint soft bull, magenta strong bear, lavender soft bear, gray chop. Pills show IVR / IV / EXP / ATR% for structure and a SQZ (squeeze) state. Above +50 or below –50 is real conviction. |
| GRID Upper · structure |
"Is the trend healthy enough to trade?" | Three nested dashed channels wrapping price (long / mid / short). The dashboard gate reads one word: BUY HOLDING BULL EXIT WAIT. HOLDING BULL = stay in. WAIT = no new entries. |
| TIDE Lower · volume |
"Is big money actually here this week?" | Split volume bars (green buying / magenta selling) vs. the prior-period average. Dashboard reads TREND BULL/BEAR (with SURGE when volume is unusual), plus a VOL% pill: yellow ≥200% (unusual — max size), green ≥100% (above average — full size), gray <100% (thin — size down). It is your sizing dial, not an entry trigger. |
The 3-of-5 Rule — Before You Take Any Trade
No single indicator is a trade. The desk is built so the five confirm each other. Require at least three of the five to agree before you commit. More agreement = bigger size. Fewer than three = stand aside and let theta work on what you already hold.
The Full Stack in Action
Before we break down each indicator individually, here is the entire Hou5eMoney Tradedesk running live on a single ticker. Every panel below the price chart is one of the five indicators. When they all light up the same color, the trade picks itself.
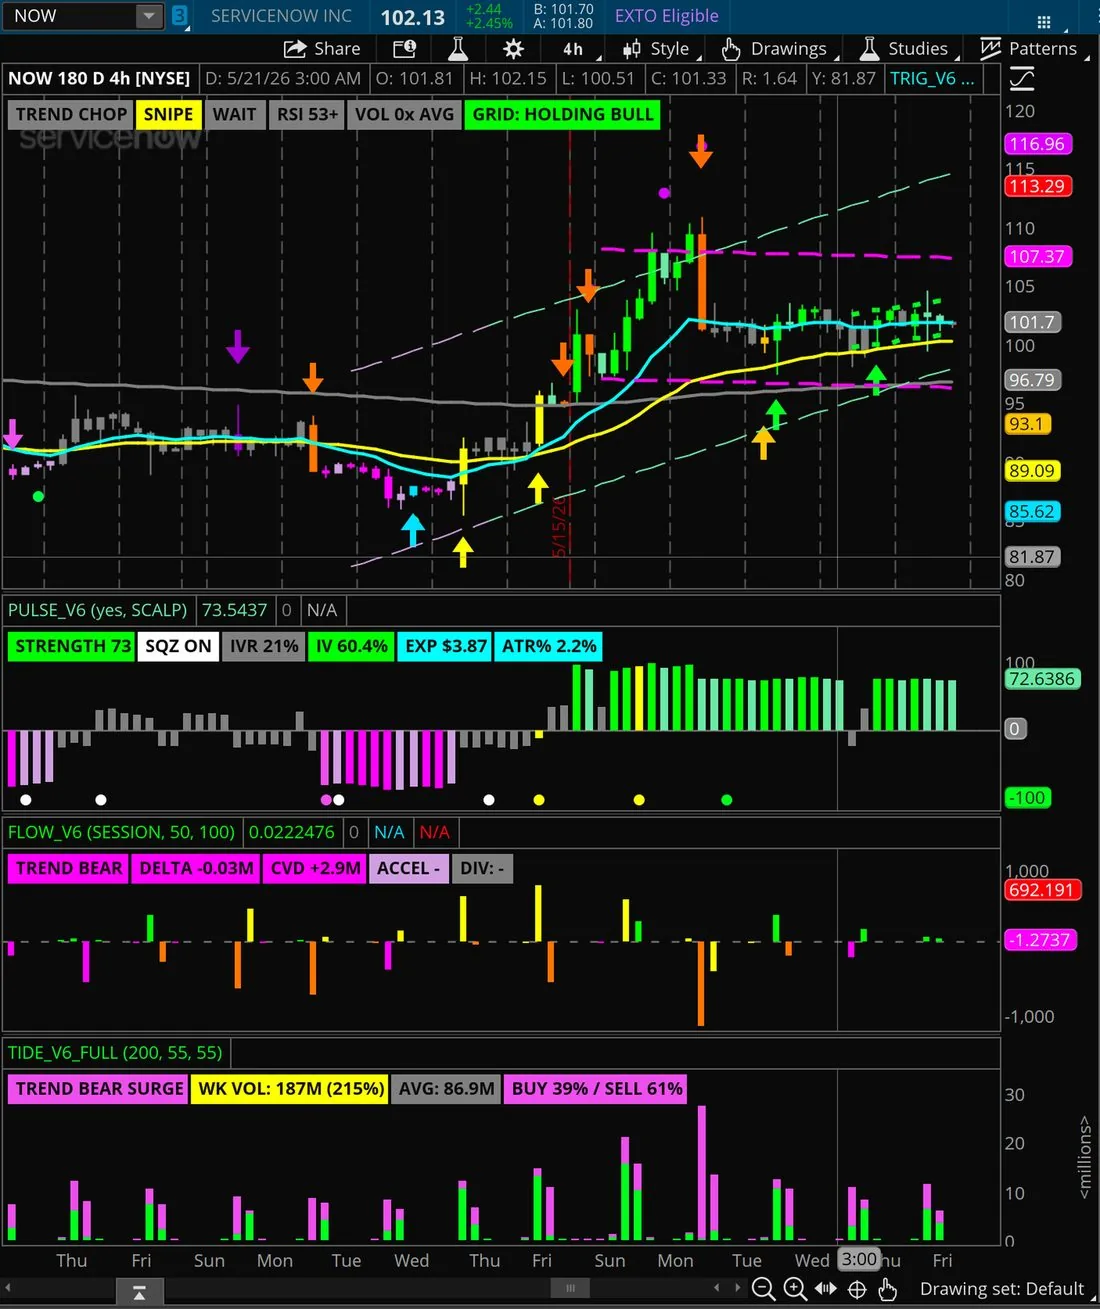
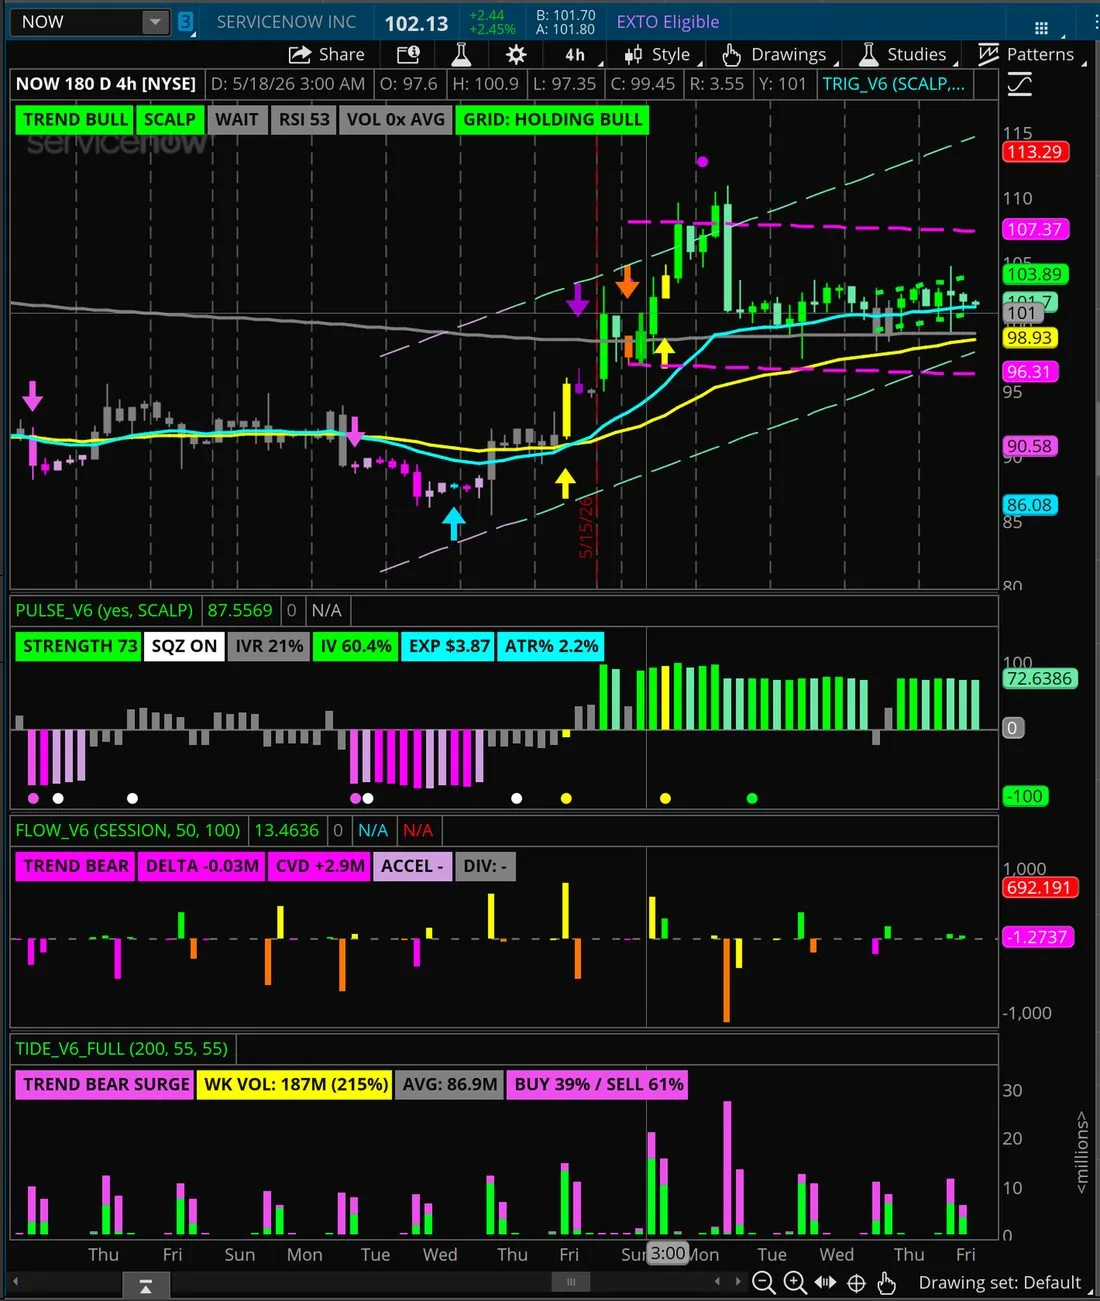
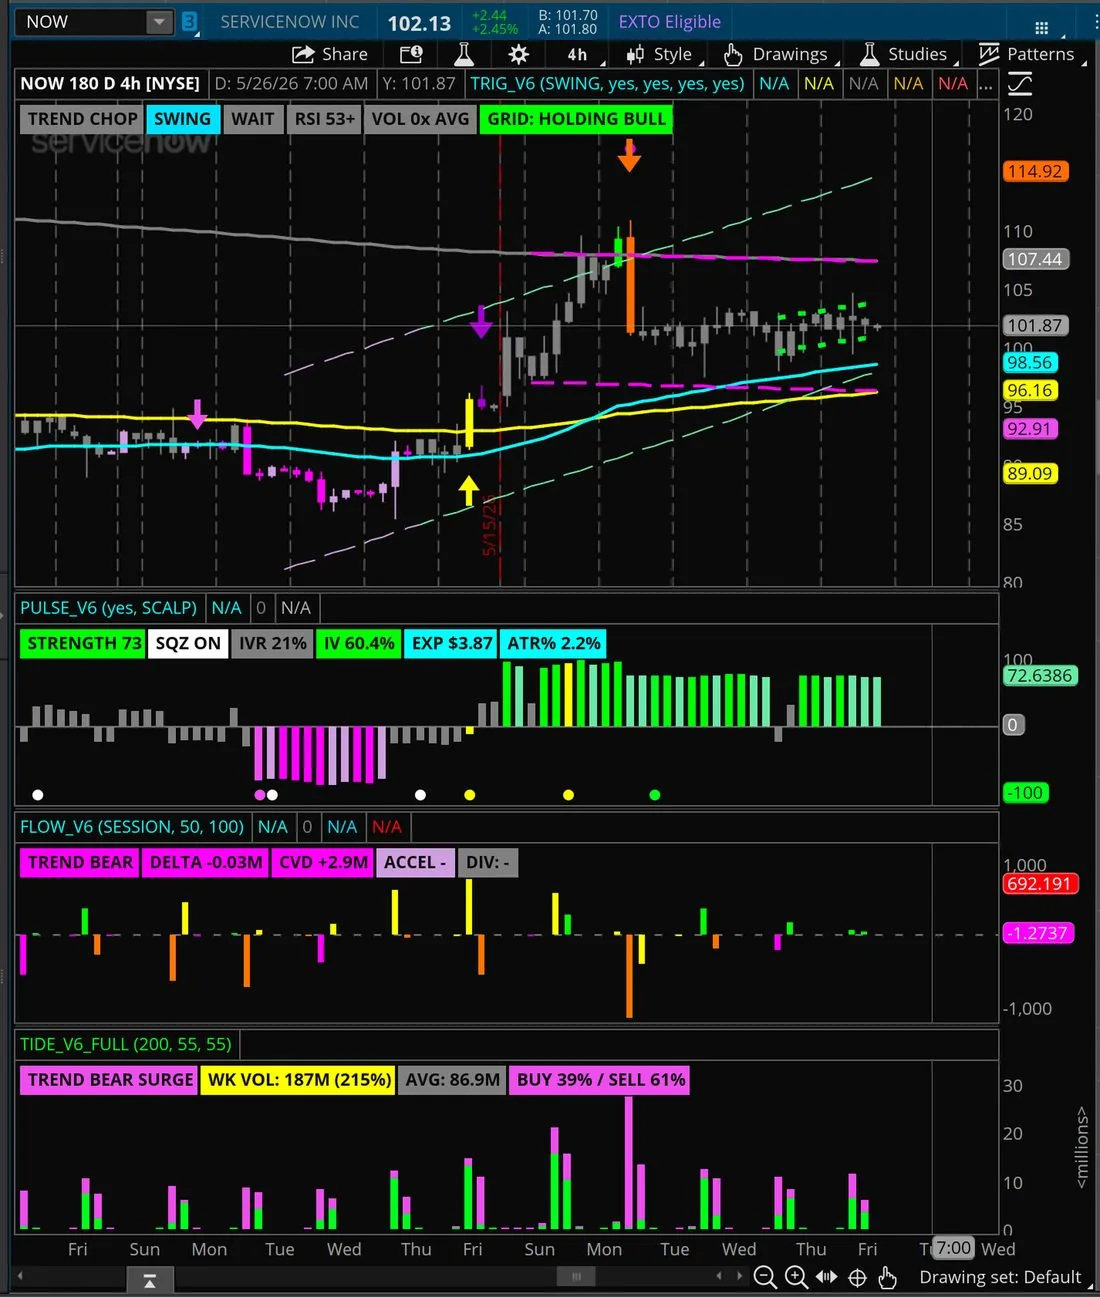
The same NOW 4h chart under all three TRIGGER speed settings. Notice how the dashboard, entry arrows, and trend state shift: SNIPE fires the most triggers (fast EMAs, 3-bar cooldown), SWING the fewest (slow EMAs, 12-bar cooldown), SCALP sits between. Set PULSE to the same speed as TRIGGER so their trend states agree.
Top Panel — Trigger
Price action with EMA stack, color-coded candles, and entry arrows. This is your when.
Middle Panels — Pulse & Flow
Strength meter, IVR, trigger dots, delta, and CVD. This is your how hard and who is winning.
Bottom Panel — Tide
Weekly volume regime — your position sizing dial. Heavy week = full size. Thin week = half.
Trigger — Your Entry Clock
Trigger is the only indicator that says "take the trade." For options traders, Trigger replaces the need to guess entry timing. When an arrow fires, that is your reference bar — your strike selection anchor, your delta decision, your debit or credit entry point. Never enter a spread without an arrow or an Exit Dot trigger. A colored candle alone is noise.
How Trigger Arrows Map to Options Entries
| Trigger Arrow | Options Entry (IVR > 50%) | Options Entry (IVR < 50%) |
|---|---|---|
| ↑ BREAKOUT | Sell bull put spread — strike below breakout candle low | Buy bull call spread — long strike at or near breakout close |
| ↑ BUY DIP | Sell CSP or bull put spread — strike below dip low | Buy bull call spread — catches the bounce with defined risk |
| ↑ CONFLUENCE BUY | Sell bull put spread — size up. Highest IVR environment favored. | Buy bull call spread — size up. Strongest trigger. Do not pass. |
| ↑ RECLAIM BUY | Sell CSP below the reclaim candle low | Buy bull call spread — fast move expected post-reclaim |
| ↑ TRAP LONG | Sell bull put spread — size for the snapback | Buy bull call spread — the snapback is fast, favor debit |
| ↓ BREAKDOWN | Sell bear call spread — strike above breakdown candle high | Buy bear put spread — long strike at or near breakdown close |
| ↓ SELL RIP | Sell bear call spread — strike above rip high | Buy bear put spread — catches the fade with defined risk |
| ↓ CONFLUENCE SELL | Sell bear call spread — size up | Buy bear put spread — size up |
| ↓ RECLAIM SELL | Sell bear call spread — strike above the reclaim-sell candle high | Buy bear put spread — failed breakout rolling over, fast move expected |
| ↓ TRAP SHORT | Sell bear call spread — size for the snapback | Buy bear put spread — the snapback is fast, favor debit |
This is the full arrow set Trigger actually paints on the chart — all ten triggers the live script defines, in the same colors.
See It Live — Real Arrows, Real Chart
This is the exact same live HM5 chart used on the Tape — not a mockup or a screenshot. Every arrow painted below is TRIGGER reading real data, in the same colors as the table above. Scroll back through the candles and you'll find real examples of most of the ten triggers. Open it full-size, or switch the symbol →
FLOW Divergence Dots — Now Right on Your Candles
Trigger now prints the FLOW divergence dots directly on the price chart, so you see the early-warning sign without dropping your eyes to the lower pane. Cyan dot below a candle = bull divergence (price made a lower low, CVD did not — the dip is finishing, look for longs). Red dot above a candle = bear divergence (price made a higher high, CVD did not — fade the rip). Each chart dot sits at the exact same bar as its twin in the FLOW pane below it, so they line up vertically — the dot on price and the dot in FLOW are the same trigger.
Bright vs. faint: a bright, solid dot means the bar's own order-flow delta confirms the divergence — higher conviction. A faint, dim dot means the divergence is forming but the bar hasn't confirmed yet — watch it, don't act on it alone. A divergence dot is a heads-up, not an entry. Wait for a Trigger arrow or an Exit Dot on the same zone before you commit.
TRIGGER on the Dashboard — every pill, plain English
When the indicators load, your screen fills with little colored tags called pills — each one is a single fact about the market right now. Color is the shortcut: green = go / strong, yellow = caution / decision, red & magenta = stop / down, cyan = a number to read, gray = nothing happening. Each indicator’s pills are decoded right in its own section — here are TRIGGER’s.
| Pill | In plain English |
|---|---|
| TREND | Which way the market is leaning: BULL (up), BEAR (down), or CHOP (no clear direction — sit out). This is the first thing you read, every time. |
| SCALP | Your speed setting — how twitchy the triggers are. SNIPE = fast/short trades, SCALP = balanced, SWING = slow/longer holds. Just tells you which mode the chart is in. |
| CONFLUENCE / BUY DIP / BREAKOUT… | The current trigger — what the chart wants you to do right now (or WAIT if nothing). The arrows on the chart are the same triggers. |
| RSI | A 0–100 "how stretched is it" meter. Over 70 = ran up hot (may pull back), under 30 = sold off hard (may bounce). The + means an extra-strong trend. |
| VOL | How busy this bar is vs. normal. 1.0x = average, 2x = double the usual crowd, 0.4x = quiet. More volume behind a move = more real. |
Flow — The Clarity Engine
Flow estimates order flow — who appears to be winning the volume battle inside each candle. It uses price position within each bar's range as a proxy for buying and selling pressure, then tracks it cumulatively as CVD. This is a directional pressure gauge, not an exact audit — treat it as a confidence tool, not a certainty. For options traders, Flow is your directional reality check. It prevents you from entering a credit spread into a trap reversal or a debit spread into exhausted momentum. Before every spread entry, confirm Flow agrees with your direction.
FLOW in Plain English — the War and the Punch
Three numbers on the FLOW dashboard trip up new traders. Here they are in dead-simple terms — think of every candle as one round of a fight between buyers and sellers:
One line to remember: CVD tells you who's winning the war. ACCEL tells you who won the last punch. They can disagree — and that's the whole point: the punch turns before the war does.
For Credit Spread Entries
Bull put spread: TREND BULL + CVD rising. Selling puts into genuine accumulation.
Bear call spread: TREND BEAR + CVD falling. Selling calls into genuine distribution.
If TREND is FLAT or opposite to your spread direction — wait. You're selling premium into uncertain flow. That's a coinflip, not an edge.
For Debit Spread Entries
Bull call spread: ACCEL UP bars (yellow) confirm buyers pressing. TREND BULL + rising CVD = the move has legs.
Bear put spread: ACCEL DN bars (orange) + TREND BEAR + falling CVD.
Divergence dots are your best friend. Cyan dot at the bottom = bull divergence = buy call spread dip. Red dot at the top = bear divergence = buy put spread fade. These same dots now print directly on the TRIGGER price chart too — a cyan dot below the candle for a bull divergence, a red dot above the candle for a bear divergence — sitting at the exact same bar as the FLOW pane dot below it, so you can read the warning right on price without looking down. A bright dot means the bar's own delta confirms it; a faint dot means the divergence is forming but not yet confirmed.
FLOW on the Dashboard — every pill, plain English
| Pill | In plain English |
|---|---|
| TREND | Who's ahead in the whole fight — BULL (buyers), BEAR (sellers), FLAT (tied). |
| DELTA | Who won this one bar and by how much. + = buyers, − = sellers. |
| CVD | The running score of every bar added up = the trend. Falling = sellers ahead overall. |
| ACCEL | Is the latest push harder or softer than the last? ACCEL UP ≠ price up — it means selling is easing. An early heads-up the trend may turn. |
| DIV | "Divergence" — price and the buyers/sellers disagree (a reversal warning). − means none right now. |
Grid — The Structure Backbone
Grid draws three nested channels that wrap price action. For options traders, Grid answers the question: "Is the trend healthy enough to sell premium against, or is it breaking down?" The GRID action gate on the Trigger dashboard tells you in one word.
| Grid State | Options Action |
|---|---|
| GRID: BUY | New bull put spread or CSP entry. EMAs just stacked bull. Momentum confirmed. Full size. |
| HOLDING BULL | Hold existing bull spreads and CSPs. Theta working. Trail covered calls with fast EMA. |
| GRID: EXIT | Close or roll all bull spreads. Fast EMA crossed below mid EMA. Trend breaking. Do not argue with it. |
| GRID: WAIT | No new spreads in either direction. Stand aside. Cash is a position. Theta kills buyers; assignment risk kills sellers in unclear trends. |
GRID on the Dashboard — every pill, plain English
| Pill | In plain English |
|---|---|
| BUY | A fresh healthy up-trend just started. Green light for new longs. |
| HOLDING BULL | The up-trend is still good — stay in what you've got. |
| EXIT | Momentum rolled over. Time to close or tighten up. |
| WAIT | No clean trend. Don't open anything new. |
Pulse — Your Structure Selector
Trigger says when. Pulse says how hard and what structure. The six Pulse pills are your options trade blueprint. Read them before you pick a single strike.
| Pill | What It Shows | Options Implication |
|---|---|---|
| STRENGTH 78 | Composite momentum –100 to +100 | >+50 = debit spread has directional backing. <±20 = chop, no spreads. Below –50 = bear structure only. |
| SQZ ON / FIRED | Squeeze state. ON = coiling. FIRED = breaking. | SQZ FIRED in bull regime = buy debit call spread NOW before IV expands. SQZ ON = wait for direction. |
| IVR 47% | IV Rank — current IV vs. 52-week range | The structure decision pill. >50% = sell premium. <30% = buy premium. 30–50% = context-dependent. |
| IV 28.4% | Current implied volatility, annualized | Rising IV (green) = premium expanding. Sell before it peaks. Falling IV (gray) = sell opportunity diminishing. |
| EXP $5.59 | Options-implied expected dollar move | Your minimum distance for strike selection. Short strikes go outside EXP. Spread width should exceed EXP. |
| ATR% 1.5% | Recent average bar range as % of price | Higher ATR% = wider stops needed = wider spread widths = more premium. Use this to size spread width. |
PULSE on the Dashboard — every pill, plain English
| Pill | In plain English |
|---|---|
| STRENGTH | One number, −100 to +100, for how powerful the move is. Past +50 = strong up, past −50 = strong down, near zero = weak/chop. |
| SQZ | "Squeeze." ON = price is coiling tight like a spring (a big move is loading). FIRED = the spring just released — move starting. OFF = nothing coiled. |
| IVR | The most important options pill. "Is option premium expensive or cheap right now?" (0–100%). Over 50% = expensive → SELL premium (credit spreads). Under 30% = cheap → BUY premium (debit spreads). |
| IV | Implied Volatility — how much movement the market is pricing in. Higher = options cost more. IVR (above) turns this into an easy "cheap or expensive" read. |
| EXP | The Expected Move in dollars — how far this stock can realistically travel in one day. You place your option strikes outside this number. (Full tab on this later.) |
| ATR% | Average daily swing as a % of price — basically "how jumpy is this stock." Bigger = wider moves = give your trade more room. |
Tide — The Size Multiplier
Tide answers: "Is institutional money actually showing up this week, or is this a thin tape I should size down on?" For options traders, Tide is your position sizing dial. A great Trigger arrow in a thin-volume week is a half-size trade. The same trigger in a TREND BULL SURGE week (unusual volume, buyers leading) is a full-size trade or more.
| Tide Reading | Spread Sizing Rule |
|---|---|
| TREND BULL SURGE + yellow VOL pill (≥200%) | Maximum size. Full premium. Unusual institutional volume with buyers leading — the spread has the wind at its back. |
| TREND BULL + green VOL pill (≥100%) | Full size. Above-average participation with buyers leading confirms the trend trigger. |
| TREND BULL + gray VOL pill (<100%) | Standard-to-half size. Buyers lead but on thin participation — whippy candles, the spread can get tested. Size down. |
| TREND BEAR + gray/green VOL pill | No new bull spreads. Sellers are leading — bias is down. Manage or close existing longs. |
| TREND BEAR SURGE + yellow VOL pill (≥200%) | Bear structure only. Unusual volume with sellers leading. Any bull spread you have on should be evaluated for early closure or roll. |
TIDE on the Dashboard — every pill, plain English
| Pill | In plain English |
|---|---|
| TREND | Are buyers or sellers controlling the volume this period. SURGE = unusually heavy. |
| VOL % | This period's volume vs. normal. ≥200% (yellow) = unusual, big players in → max size. ≥100% (green) = above average → full size. <100% (gray) = thin → size down. A P = partial (week not finished). |
| AVG | The normal volume it's comparing against. Just the yardstick for the VOL % above. |
| BUY / SELL % | The split inside the bars — what share was buying vs. selling. 65% sell = sellers did most of the work. |
Options: The Language
You don't need to be an options mathematician. You need to know what each structure does, when the Tradedesk calls for it, and how to enter and exit cleanly. Here is everything you need — nothing more.
The Four Building Blocks
Call Option
The right to buy 100 shares at the strike price before expiry. Gains when price rises above the strike. Costs a premium — paid upfront, at risk if price stays flat or falls. Tradedesk trigger: BREAKOUT, BUY DIP, CONFLUENCE BUY in bull trend.
Put Option
The right to sell 100 shares at the strike price before expiry. Gains when price falls below the strike. Costs a premium — paid upfront, at risk if price stays flat or rises. Tradedesk trigger: BREAKDOWN, SELL RIP, CONFLUENCE SELL in bear trend.
Selling a Call (Short Call)
You collect premium and take on the obligation to sell shares if assigned. Profits from flat-to-down price action or from IV crush. Used in covered calls and credit spreads. Best when: trend is neutral-to-bear, IVR > 50%.
Selling a Put (Short Put)
You collect premium and take on the obligation to buy shares if assigned. Profits from flat-to-up price action. Core of the Wheel strategy. Best when: trend is bull, IVR > 50%, Tide showing heavy flow.
Naked Positions vs. Spreads — Know the Difference
The word "naked" gets used two ways in options. Both matter. Both can hurt you if you mix them up.
Naked Long — Buying a Call or Put Outright
You buy a call or a put with no other leg attached. One single contract. You pay the full premium upfront. Your max loss is what you paid — nothing more. Max gain is uncapped on a long call (price can rise forever) or large on a long put (price can fall to zero). This is what most retail traders mean when they say "naked call" or "naked put" — but the cleaner term is long call or long put. Example: Buy 1 SPY $480 call for $3.50. You paid $350. If SPY rips, you can make hundreds. If SPY does nothing, you lose the $350 — full stop, no margin call, no assignment risk.
Naked Short — Selling a Call or Put Without a Hedge
You sell a call or put with no protective long leg. You collect premium upfront — but your downside is undefined. A naked short call has theoretically unlimited loss (stock can rise to infinity). A naked short put can lose huge amounts if the stock craters to zero — and you'll be assigned 100 shares at the strike either way. This is the dangerous "naked" — and the one this playbook is built to prevent. CSPs (cash-secured puts) are technically naked shorts but covered by cash. Credit spreads are NOT naked — the long leg is your hard stop.
When to Use a Naked Long vs. a Debit Spread
Both make money on the same directional read. Different trade-offs.
| Use a Naked Long (Long Call / Long Put) When... | Use a Debit Spread When... |
|---|---|
| You expect a large, fast move — earnings, breakout off a squeeze, CONFLUENCE BUY/SELL with Tide unusual | You expect a moderate move within a defined range |
| IVR is very low (under 25%) — premium is cheap, no point capping upside with a short leg | IVR is moderate (25–50%) — short leg helps offset the IV cost |
| You want uncapped upside — willing to pay more for the home run potential | You want defined max gain and defined max loss — sleep-at-night math |
| Account is small and you only have a few hundred to risk | You can afford the slightly higher net debit of a multi-leg structure |
The Three Greeks You Actually Use
| Greek | What It Measures | How the Tradedesk Handles It |
|---|---|---|
| Delta | How much the option moves per $1 move in the stock | Trigger arrows + trend direction = delta selection. In-trend = higher delta. Counter-trend = lower delta or no trade. |
| Theta | Daily premium decay — time working for the seller, against the buyer | GRID: HOLDING BULL = theta working in your favor on CSPs/covered calls. GRID: WAIT = theta risk for buyers. |
| Vega | How much the option moves per 1% change in IV | IVR pill on Pulse. IVR > 50% = sell vega (credit). IVR < 30% = buy vega (debit). Never ignore this pill. |
Advanced Structures — Know These, But Don't Chase Them
These structures exist. You will hear about them. Here is what they are and why the Tradedesk does not prioritize them for most traders.
| Structure | What It Is | When Traders Use It | Why We Deprioritize |
|---|---|---|---|
| Iron Condor | Sell OTM call spread + sell OTM put spread simultaneously. Profits from low volatility. | When IVR is very high and you expect price to stay in a tight range. | Requires precise range prediction. Tradedesk is a trending system — condors fight trending markets. |
| Straddle / Strangle | Buy (or sell) a call AND a put on the same stock. Profits from a large move in either direction. | Around earnings or major events when a big move is expected. | Extremely expensive to buy; dangerous to sell without defined risk. Not a Tradedesk structure. |
| Calendar Spread | Sell a near-term option, buy a longer-dated option at the same strike. Profits from theta decay. | When IV is low short-term but you expect a rise. | Requires precise IV timing. Complex to manage. Master spreads first. |
| Butterfly | Three strike, limited-risk structure that profits from pinning at a specific price. | High precision setups near known support/resistance. | Narrow profit zone. Hard to time. Not mechanical with the Tradedesk triggers. |
Close Early. Don't Wait for Expiry.
This is the single most important habit separating profitable options traders from blown-up accounts. Whether you are running credit spreads, debit spreads, CSPs, covered calls, or a naked long call you bought on a breakout — you do not hold to expiry. You close at a planned profit target. Read the rest of this page twice. Tape it to your monitor.
Why You Close Early — The Math
It feels good to "win the whole credit" or "let the spread expire worthless." It is also the single fastest way to give back a winning trade. Here's why.
Theta Decay Is Not Linear
The first 50% of theta decay on a 45 DTE spread typically arrives in the first 14–21 days. The last 50% takes the remaining 24–31 days. You are paid most of your premium long before expiry — and risk all of it for the diminishing remainder. Close the trade. Free the capital. Re-deploy on the next trigger.
Gamma Risk Explodes Near Expiry
Inside the last 7 days of an option's life, the price moves more violently per dollar of stock movement. A spread that's been quietly winning for 30 days can flip from +60% to −90% in a single afternoon if the stock makes one move through your short strike. The last week of an option's life is the most dangerous. Close before you get there.
Risk-Adjusted Return Math
The longer you hold for the last scraps of premium, the worse the trade-off gets — you risk a large share of your max loss to squeeze out a shrinking remainder of max profit. The early part of the move is the cheap, easy part; the tail end is where the risk-reward turns against you. Take the early skim. Start a new trade. Compound winners.
One Bad Pin Erases a Month
A single short strike that closes one cent in-the-money on Friday can wipe out four winning trades. Assignment risk on the short leg around dividends, news, or a Friday close near your strike turns a "winning" position into a forced shares position. Close it. Don't get pinned.
The Profit-Take Matrix — Every Structure
Place these closing orders the moment you fill the opening trade. The credit targets below are the Hou5eMoney house default — adjust them to your own comfort. "Set it, walk away, let it work."
| Structure | House Close Target | Why |
|---|---|---|
| Bull Put Spread (credit) | Buy to close at ~75% of the credit (bank 25%) | You captured the easy part of the move. Don't risk gamma chasing the rest. |
| Bear Call Spread (credit) | Buy to close at ~75% of the credit (bank 25%) | Same math, mirrored direction. Skim and reset. |
| Iron Condor (credit) | Buy to close at ~75% of the credit (bank 25%) | Two short strikes = double the gamma exposure. Take the bite and move on. |
| Cash-Secured Put (CSP) | Buy to close at ~75% of the credit (bank 25%) | Frees cash to sell another CSP. The Wheel only spins if you keep moving. |
| Covered Call | Buy to close at ~75% of the credit (bank 25%) | Lets you roll up if the stock keeps rallying. Don't get called away cheap. |
| Bull Call Spread (debit) | Aim for ~25% of max (35% at A, 50% at A+) — the card prints the sell-to-close price | Debit plays are directional. The card's number is the aim, not a promise: take it, or use the Exit Dot if the move stalls first. |
| Bear Put Spread (debit) | Aim for ~25% of max (35% at A, 50% at A+) — the card prints the sell-to-close price | Same idea, mirrored. Plan your exit before you enter. |
| Long Call (naked long) | Small bite — take the target on the card: +25% base, up to +35% at A and +50% at A+ | Theta grinds against you every day. The Naked Trades board sizes each idea's exit for you and shows it on the card; take the money and re-enter on the next arrow. |
| Long Put (naked long) | Small bite — take the target on the card: +25% base, up to +35% at A and +50% at A+ | Long puts decay even faster as IV crushes after the move, which is exactly why the exit is small and mechanical. |
How to Place a Closing Order
Do this immediately after every opening fill. It takes 30 seconds. It is the single highest-EV habit in options trading.
Step-by-Step — GTC Closing Order
- Right-click your filled position in the Monitor → Position Statement tab.
- Select "Create Closing Order". The ticket will populate with the exact opposite of your opening trade (buy to close if you sold, sell to close if you bought).
- Set your price to your close target. For a credit spread you sold for $1.00, set the buy-to-close around $0.75 (keeping ~25% of the credit). For a debit trade, set your sell-to-close at whatever gain you've decided you're happy taking.
- Change Duration to "GTC" (Good 'Til Canceled). The order stays alive across sessions until it fills or you cancel it.
- Send the order. Walk away. The Tradedesk will tell you if the trend changes before your target hits — and that is the only reason you'd cancel early.
When to Close Before Hitting Your Profit Target
Taking up to 25% of the credit is the house default. But the Tradedesk overrides any target on three triggers — close early no matter where you are.
Trend Flip Against You
Purple Exit Dot, GRID: EXIT, or Trigger arrow reversal against your position = close immediately, even at 20% profit or a small loss. The read is gone. Take what's left.
Big Move Through Your Short Strike
If the stock blows through the short leg of a credit spread, do not wait for "max loss" to fill. Close it — or roll it — when the spread is at 2x the credit received. Hogs get slaughtered.
21 DTE — The Tom Sosnoff Rule
If a credit spread or CSP hasn't reached your close target by 21 days to expiry, close it or roll it. Don't ride into the gamma zone hoping for a comeback. Gamma kills theta sellers in the last three weeks.
Reading The Tape
The Tape is one page with several boards on it. Each board holds cards, and each card is one complete trade idea. Learn to read one card and you can read every board, because they all use the same shape and the same colors.
Here is one, taken apart.
What To Do With It
The Color Language
Every board, every chart and every pill on this site speaks the same six colors. Learn them once and the whole desk reads itself.
The Chart’s Controls
The controls around the chart, as you will actually see them. Beside them sit Full Screen, Replay (step back through history and watch the triggers fire as they did) and Reset view (back to the default zoom after a pinch or scroll).
1 — The timeframe strip
Each pill is colored by that timeframe’s own trend, and clicking one switches the chart to it. The white ring shows which you are on. One control doing two jobs: picking a timeframe and reading its bias are the same glance.
2 — Candle type
Real candles are the default, so a bar here is the same bar your broker’s chart shows. Heikin-Ashi averages each bar into its neighbors, which strips noise out of a trend and makes a run of one color far easier to see — one tap, and the chart remembers your choice.
What A Heikin-Ashi Candle Is Not
An HA candle’s open and close are averages, not traded prices — nothing changed hands at that number. Read the trend from the candles and take your numbers from the readout, which always shows the real bar. Switch to REAL any time you want true open, high, low and close on screen.
3 — Speed
How fast the indicators react. Snipe fires early and often; Swing waits for confirmation and fires rarely; Scalp sits between them and is the default. It changes the EMA lengths and the trigger thresholds — not the color language.
4 — Markup tools
The pencil opens the rail: cursor, trend line, price level, zone, measure, note, eraser — plus undo and a color swatch.
| Tool | What it does |
|---|---|
| Price level | Click to drop a horizontal line. It snaps to a nearby high, low or close so you are not eyeballing it to the pixel. |
| Trend line | Drag from one point to another. The label shows the move in percent. |
| Zone | Drag a box over an area that matters — a supply shelf, a gap, a range. |
| Measure | Drag anywhere to read the move in dollars, percent and bars. Nothing is saved. |
| Note | Click and type a label straight onto the chart. |
5 — The readout
Point at any candle and this appears top-right with that bar’s real open, high, low, close and change — the exact numbers, not an estimate read off the axis. In Heikin-Ashi it still shows the true bar, marked HA.
Reading The Chart On A Card
Open any card and the chart sits on the right. It is four panels stacked, and the order is deliberate — you read downward, from what price is doing to whether the money agrees.
The colored pills across the top of the chart are also the timeframe selector — 1M, 5M, 15M, 1H, 4H, D, W. The two fastest refresh every minute; every chart runs 15 minutes behind unless you have connected live data, and only completed candles are drawn, so nothing on a chart can be mistaken for a live print. Each is painted with that timeframe’s own trend, so you can see the whole stack agreeing before you click into any of them. Several green together is the confirmation. The weekly is where you start.
Two Things That Will Save You Money
Gray is an answer. Most days, most names are chop. A page full of gray is the system working, not failing. The trade you did not take is free.
The card is a plan, not a prediction. Every number on it — strikes, cost, target, time stop — exists so you know in advance what you will do. Deciding after you are already in the trade is how small losses turn into big ones.
Take The Trade Without Leaving The Site
Everything in this playbook comes together here: the same read, the same trade, placed from the card you are already looking at, tracked the way a broker’s desk tracks it. Nothing to install, nothing to export, no strikes to retype into a second platform.
The Map — Where Everything Lives
| Where | What it is for |
|---|---|
| The Tape | The boards. Every card carries Practice This Trade. Above the boards, one line shows your paper account: equity, open trades, P/L, working orders. The desk bar has Positions, Trade and Live Data tabs that jump straight to the Desk. |
| Desk → Monitor | Your Activity and Positions, laid out like a broker’s Monitor tab: today’s working, filled and canceled orders, then the Position Statement with every spread and its legs. |
| Desk → Trade | The chart, the option chain and Order Entry on one screen. Build any spread by clicking the chain. |
| Desk → Account | Your starting size, the 10% / 1% rule, the size calculator, and the broker you place real trades at. |
| Desk → Log · Journal | Every closed trade, and your end-of-day notes with quick notes. |
| Desk → Live Data | Connect your own broker for real-time quotes and chains on the Trade tab. |
| Desk → Guide | The short version of this chapter, plus a 60-second walkthrough you can replay. |
Step One — Your Paper Account
Your membership comes with a paper account. Simulated money, real prices. It exists so you can run the system for a few weeks and find out whether you can follow it, before a single dollar is at risk.
What A Paper Fill Is Worth
Fills, prices and costs in a paper account are simulations. They cannot model real liquidity, your place in the queue, partial fills, slippage, commissions or assignment — and they cannot model what your hands do when it is your own money. Simulated performance does not ensure success in a live environment.
Step Two — Practice This Trade
Every idea on every board carries a Practice This Trade button, on the collapsed row and again inside the open card.
Cost In & Out — The Number Beside The Debit
Every option card now shows Cost in & out: the two legs’ bid-ask gaps added together, as dollars per share and as a share of the premium (“$0.14 · 4.6%”). That is what the market charges to open and close the spread at the quoted prices — paid once on the way in and once on the way out, whether the stock cooperates or not. Two rules follow from it. A bite smaller than the cost is not a trade: if the card’s target banks 5% and the cost is 6%, the stock can do exactly what the card says and you still lose. And rest the order near the mid: a limit between Nat and Mid pays a fraction of that number; a market order pays all of it. On the Tape’s table view, sort the board and you will see the same structure priced at 2% on one name and 9% on another. Take the 2%.
Read The Ticket Anyway
Prefilled is not the same as correct. Chains move, and a card priced twenty minutes ago can be stale by the time you press the button. The number on the ticket is the number you are agreeing to.
Working Orders — Letting The Market Come To You
A limit below the market is how you get paid for patience. Rest one and it appears at the top of the Tape and under Monitor → Working Orders with a WORKING pill, the market’s mark against your limit and how far away it is (“0.40 away”, “at your price”).
- Modify moves the limit. Walk it toward the mark to get filled; if the new price is at or through the market it fills on the spot. Every change is re-checked against the 10% rule.
- Cancel pulls it. Fills and cancels stay visible for the day with FILLED and CANCELED pills, and forever in the Order and Strategy Book.
- Orders are checked against a live last-trade price every two minutes through the session, and every minute while you have the Tape or the Desk open. A working order fills once, and only once.
Step Three — The Monitor Tab
Open Desk → Monitor and it reads like a broker’s Activity and Positions page.
Closing A Trade — Exits, Targets And Stops
A plan without an exit is a hope. Close books it at the mark and writes it to the Log. Exits opens the closing ticket and rests orders on the position, the way a bracket sits on a broker’s Monitor tab:
Step Four — The Trade Tab: Chart, Chain And Order Entry
Desk → Trade is where you build your own. It is laid out the way a broker’s Trade tab is, top to bottom.
SELL -1 VERTICAL SBUX 100 (Weeklys) 23 OCT 26 99/105 CALL @.80 LMT [TO OPEN]) with its status, and Modify / Cancel on the working ones.What The Mark Is, And Is Not
Your position is priced with a Black-Scholes model, using the implied volatility captured when you opened it, against a live last-trade price. That tracks direction and time decay faithfully and will drift from a real broker’s mark when implied volatility moves a lot. Delta and P/L Day come from the same model. It exists to tell you whether you followed your plan, not to reproduce a broker statement.
Step Five — Placing It At Your Broker, When You Are Ready
Hou5eMoney never places a real order. If you connect your broker for live prices it can only read market data there; it cannot trade. When your paper record says you follow the plan and you want an idea for real, you place it yourself at your own broker — any broker, including a funded prop account. What the desk does is make that fast and error-free.
Live Data — Your Own Broker’s Feed
The site’s feed runs 15 minutes behind. On Desk → Live Data (or the Live Data tab on the Tape’s desk bar) you can connect your Schwab or tastytrade login. You sign in at your broker and allow the site to read market data on your behalf; we never see your password and never place an order. From then on everything is real time for you, shown only to you, with a LIVE badge: live candles on every chart and timeframe, refreshed every minute, and a Trade tab chain with the market’s own IV, greeks, open interest and volume. Schwab connections last seven days; tastytrade holds until you disconnect. Tradier is next. Members without a connection keep the 15-minute feed, with the current price on the latest candle.
The Discipline Rating — The Score That Predicts Who Lasts
Every paper trade you close is graded on six checks, and not one of them is whether it made money. Six for six is +30 whether the trade won or lost. Zero for six is −30 even on a winner. The rating starts at 1,000 and the tiers run Rookie, Apprentice (900), Disciplined (1,100), Pro (1,300), Master (1,500).
| Check | What passes |
|---|---|
| Tape idea graded B or better | You took it from a Trade Radar list on The Tape while its card showed a B, A or A+. |
| With the trend | You traded the way the idea card said the chart was leaning. |
| 10% or less | The trade tied up a tenth of the account or less. |
| Exit in within 30 minutes | A target or stop was resting within half an hour of the fill. |
| Exit honored | The exit order closed it. Closing by hand over a resting order is an override. |
| Journal notes written | A Journal entry saved the day it closed, or the day after. |
Today’s three tasks. Three things a day: read the Tape (open one idea card), trade the plan (take one paper trade from a card graded A, or set an exit on one you hold), and write your Journal notes. Finish all three and the streak grows. A missed day breaks the streak, never the rating.
Play. Ten real charts a night, each stopped at a random candle with the four panes drawn up to that moment and nothing else showing. Call Buy, Sell or Pass, then the next ten candles are revealed and your call is graded. Right is +10 (plus a streak bonus), wrong is −8, a Pass never costs. It is target practice for the stack, and it is where reading a chart becomes reflex.
The Community feed. Any paper trade you take can be posted from the Desk with one click. The site builds the card itself: the name, the structure, the grade it printed with and the six checks as they fill in, plus one line from you on why you took it. Nobody types a trade and nobody claims real money. Members react with the three things a coach says: Same read, I’d pass, Nice exit. The desk posts its upcoming Live Room sessions, lessons and events there too.
The season. Every month has a board, ranked by rating and then by paper P/L. The top ten at month end get the opening call in the Live Room; the top trader gets a coaching session. Set your board name on the Rating tab.
Notifications
The bell on the Tape opens the Notification Center. Turn on push notifications for the boards you want — every board carries its own notification pill — and a new idea, or a paper trade that closed, reaches your phone even when the site is closed.
Account, Log And Journal
- Account — your starting size and the Paper Account cards (equity, free cash, in trades, the 10% cap, the 1% stop budget), the 10% / 1% / 3% calculators, and Your Broker.
- Log — every closed trade, sortable. Paper trades write themselves in; anything placed at a broker you add by hand.
- Journal — your two-minute end-of-day notes, plus quick notes and ideas during the session. Everything you type stays on this device; press Export once a week to back it up. Paper positions and orders live on the desk and follow you between devices.
Why It Works This Way
Hou5eMoney is an educational desk — not a broker-dealer, not a registered investment adviser, and not your portfolio manager. Nothing on any board is a recommendation, no idea is assessed for suitability for you, and no real order is ever routed from this site. The trade is yours, placed by you, at your broker.
Seven Timeframes, One Control
The colored pills across the top — 1M, 5M, 15M, 1H, 4H, D, W — do two jobs at once. Each one's color is that timeframe's trend, so you can read the whole stack at a glance; and clicking one switches the chart to it. Lining several up green together is the multi-timeframe confirmation the desk is built on. The white ring shows which one you are charting.
Heikin-Ashi Or Real Candles
The REAL / HEIKIN toggle sits next to the speed control. Real candles are the default — true open, high, low and close, so a bar here is the same bar your broker’s chart shows on the same timeframe. Heikin-Ashi averages each bar into its neighbors, which strips the noise out of a trend and makes a run of one color much easier to see; it is what the desk reads on, and one tap turns it on. The chart remembers whichever you pick.
What A Heikin-Ashi Candle Is Not
An HA candle's open and close are averages, not traded prices. Nothing changed hands at that number. So never size or price an order off an HA body — read the trend from the candles and take the numbers from the readout, which always shows the real bar. Switch to REAL any time you want true open, high, low and close on screen.
Marking Up The Chart
The pencil at the top-left of the price panel opens the markup tools: trend line, price level, zone, measure, note and an eraser, plus undo and a color swatch.
- Price level — click to drop a horizontal line. It snaps to a nearby high, low or close so you are not eyeballing it.
- Trend line — drag from one point to another. The label shows the move in percent.
- Zone — drag a box over an area that matters.
- Measure — drag anywhere to read the move in dollars, percent and bars. Nothing is saved.
- Note — click and type a label onto the chart.
The Readout And The Crosshair
Point at any candle and the top-right readout gives you that bar's real open, high, low, close and percent change — the exact numbers, not an estimate off the axis. At the same time the crosshair lights up on all four panels, so "what was order flow doing here" is one glance instead of holding a finger on the screen. That shared crosshair is the whole reason to stack price over Pulse, Flow and Tide.
Replay
The Replay button steps back through the bars already loaded and lets the triggers fire in order, as they did live. No lookahead — the indicators only know what they knew at that bar. It is the cheapest practice on the site: run a week of a name you know and watch where you would have entered.
Next upThe WheelThe income engine — cash-secured puts, covered calls, and getting paid to wait.→The Wheel Strategy
The Wheel is the most mechanical, Tradedesk-friendly options strategy that exists. It is a three-stage cycle that generates premium income from stocks you are already bullish on — using the same trend triggers you already read every day. The Tradedesk was built for this.
Reading the Tradedesk for the Wheel
| Tradedesk Trigger | Wheel Action | Notes |
|---|---|---|
| TREND BULL all 5 | Sell the CSP — full size | Strongest environment. Theta working, trend backing the position. |
| CONFLUENCE BUY | Sell CSP immediately on bar close | Highest-conviction long trigger. Best entry for a new CSP cycle. |
| BUY DIP + IVR > 50% | Sell CSP at the dip low | Price pulled back to fast EMA. Premium elevated. Ideal wheel entry. |
| GRID: HOLDING BULL | Hold existing CSP / covered call | Trend intact. Let theta decay work. No adjustments needed. |
| CHOP on any indicator | No new CSPs. Manage existing only | Chop means price can break either way. Never start a wheel in chop. |
| TREND BEAR / BREAKDOWN | Close or roll CSP immediately | Trend flipped. The stock is moving against your put obligation. Act fast. |
| EXIT LONG dot (purple) | Close covered call early / roll out | Momentum rolling over. Consider closing covered call for a profit or rolling to a higher strike. |
Wheel Strike Selection Using IVR + EXP
IVR > 50% — Ideal Wheel Environment
Premium is elevated. Every CSP and covered call you sell is collecting above-average income. Size up within your defined risk. The Pulse pill shows green when IVR is rising — that's the accelerant on your theta collection.
IVR < 30% — Thin Premium Warning
Premium is cheap. CSP income is below average. Either wait for IVR to rise, move closer to ATM (more risk), or skip the wheel and use a debit spread instead. Low IVR + BULL trend = debit call spread, not a wheel.
The Wheel — Chart Read + Order Setup
Here is what a wheel candidate looks like with the Tradedesk running. You are looking at Ford (F) — a low-priced stock with liquid options, a clear daily bull trend, and IVR near 50%. The 4H is still in chop, but the daily structure gives you the direction. You are waiting for the 4H to confirm before opening the CSP.
📊 What You're Seeing — Ford Multi-Timeframe Read
4H (left): TREND CHOP · GRID: WAIT — the fast EMA (cyan) and slow EMA (yellow) are tangled. Gray candles confirm chop. No Trigger arrow has fired. The 4H is your entry timing clock and it is saying not yet. Notice the candles are gray — that is the Tradedesk chop color.
1D (center): TREND BULL · GRID: HOLDING BULL · STRENGTH 77 — green candles with BUY DIP arrows visible. The daily is in a healthy bull trend with buyers dominating. This tells you which side of the trade you want: bull side only.
1W (right): TREND BULL · STRENGTH 25 — weakening on the weekly but still positive. IVR 42% — approaching the 50% zone. As IVR climbs toward and above 50%, the CSP income improves.
When the Trigger Fires — How to Set Up the CSP
📋 What This Order Actually Means — CSP on Ford
⚠️ What Those Red Warnings on the Ticket Actually Mean
The Wheel — Stage 3: Selling a Covered Call
Tradedesk setup: Assigned on the CSP at $112 · Now own 100 shares · GRID: HOLDING BULL · TREND BULL · IVR > 45% · Sell call above your cost basis
📋 What This Order Actually Means — Covered Call on Ford
⚠️ What Those Red Warnings on the Ticket Actually Mean
Defending A Trade
Every structure on the Tape can go against you. That is not a flaw in the system — it is the cost of doing business. What separates a desk that survives from one that doesn't is having decided in advance what you'll do when it happens, so the decision isn't made by fear at the worst possible moment.
This page is that decision, written down, for every play we publish.
The One Rule You Never Break
Never remove the long leg of a defined-risk spread
If you buy back the long side of a vertical to "free up" the short side, you have just converted a trade with a known maximum loss into one with a potentially unlimited loss. A short call with no long call above it can lose more than your entire account on a single gap. This is not a strategy, it is the way accounts get closed. If a spread is losing, you close it, roll it, or hold it — you never take it apart.
Three Questions, Before Any Adjustment
Run these in order. If any answer is no, you are not defending — you are hoping, and the correct move is to close.
| Question | If the answer is no |
|---|---|
| 1. Is my original reason still true? Trend labels still aligned? Exit Dot silent? CVD still with me? | You don't have a trade to defend. You have a trade to close. The thesis is gone. |
| 2. Would I open this exact position today, at this price? | Adjusting is a slower exit with extra commissions. Take the loss now while it's smaller. |
| 3. Does the adjustment reduce my maximum loss? | It isn't a defense. Rolling out in time, widening, and adding size all increase what you can lose. |
Why Closing Is A Defense
Traders resist closing because it feels like giving up. Mechanically it is the most reliable defense that exists: it is available always, it costs one commission, it requires no forecast, and it caps the damage at a number you can see right now. Every other adjustment is a bet that you were right about direction but wrong about timing — and that is a much narrower claim than most people admit.
The house default on a credit structure is to take the loss at 1.5–2× the credit collected. If you sold a spread for $1.00, you close it around $2.00–$2.50. That keeps your loser roughly the size of two winners, which is a survivable ratio when you win most of the time. Letting it run to max loss on a $5 wide spread means one loser eats five winners.
Credit Spreads — Bull Put & Bear Call
The trigger: price touches your short strike, or you reach 21 days to expiration — whichever comes first. The 21-day mark matters because gamma accelerates sharply inside three weeks: the position starts moving against you faster than time decay can pay you.
1. Close it
The default, and what most professional premium sellers do exclusively. Take the loss at 1.5–2× credit, free the capital, sell the next one. No forecast required.
2. Roll out in time
Same strikes, later expiry, for a net credit. You're buying more time for the same thesis. Note honestly: this extends duration and raises total risk. Only if the trend still supports you.
3. Sell the other side
Turns your vertical into an iron condor. Extra credit lowers your breakeven, but you've now added risk on the opposite side. Only while the tested side is still out of the money.
Never roll for a debit
If the roll costs money, you are paying cash to remain in a position that is already telling you it was wrong. Every adjustment on a credit trade should bring money in. The moment you have to pay to stay, the trade is over.
Debit Spreads — Bull Call & Bear Put
The trigger: the trend label flips, or the Exit Dot fires. Price drifting against you is not a trigger — you bought a directional view with a known maximum loss, and noise inside that range is expected.
Before any of this: the cost line. A debit spread lives or dies on small moves, so the Cost in & out figure on the card (both legs’ bid-ask gaps, in and out) is the first number to read. Under 3% of the debit is a clean market; past 6% the spread itself is eating the bite. Prefer the liquid name, and rest the order near the mid.
There is a hard truth here: a debit spread has nothing structurally to repair. You paid a premium for a direction. If the direction is wrong, the trade is simply wrong. The adjustments below reduce the loss; none of them fix the thesis.
Close it
Recover the remaining extrinsic value and move on. The Exit Dot exists precisely so you don't have to decide this emotionally.
Sell a further spread — make it a butterfly
Sell another spread below (bull) or above (bear) your existing one. Takes in credit, lowers your cost basis and your max loss, but caps your profit at the middle strike. Turns a directional bet into a "lands in this zone" bet.
Doing nothing is also legitimate. Max loss on a debit spread is capped and known from the moment you filled it. If that number is small relative to your account, letting it expire worthless costs you nothing beyond what you already risked — and saves two commissions.
Iron Condors & Butterflies
The trigger: price breaks through one of your short strikes. The moment that happens you no longer have a neutral trade — you have a directional one, and one side is the entire position.
| Choice | What it does | What it costs |
|---|---|---|
| Close the tested side, keep the safe side | Removes the losing half. You're left holding a vertical in the direction price is already moving. | Cheapest fix. You give up the credit on the closed side. |
| Roll the untested side closer | Brings in additional credit to offset the tested side's loss. | Narrows your win zone. Works once. Do it twice and you've built a straddle by accident. |
| Close the whole thing | Ends it. | The right answer if price is through a short strike with under 21 DTE — the range thesis is dead and gamma is against you. |
Don't widen the losing side
Buying a further-out strike to "give it room" costs money and increases your maximum loss. It is the condor equivalent of moving a stop — you are paying to avoid admitting the range broke.
The Wheel — Defending Each Stage
The Wheel is unusual: what looks like a loss is often the design working. Assignment is Stage 2, not a failure. The defense therefore depends entirely on whether you still want to own the stock.
Stage 1 — Cash-Secured Put, price below your strike
Take the assignment
If you'd happily own the shares at that strike, this is the plan executing. Your cost basis is the strike minus the premium you collected. Proceed to Stage 3 and sell a covered call.
Roll out for a credit
Same strike, later expiry. Delays assignment and pays you to wait. Reasonable if you want the shares but not this week. Only ever for a net credit.
Close for a loss
If the reason you liked the company is gone — broken chart, bad earnings, sector rolling over — take the loss. Never accept assignment on a stock you no longer want to own.
Stage 3 — Covered Call, price above your strike
Let the shares go
You sold at a price you chose, and you keep the premium plus the gain to your strike. That is a win, even if the stock kept running. Redeploy the cash into a new put and spin the wheel again.
Roll up and out for a credit
Higher strike, later expiry. Keeps the shares and raises your eventual sale price. The only version worth doing is one that pays you.
Buy the call back
Costs money, and only makes sense if the thesis genuinely changed and you now want the shares outright for a bigger move. Have a reason beyond regret.
The Wheel's real risk is the name, not the structure
The Wheel doesn't blow up on the options — it blows up when you sell puts on a stock you would never actually want to own, get assigned, and then hold a falling position while selling calls beneath your cost basis. Every put you sell is a promise to buy. Only make that promise on names from the HM5 Universe that you'd be content holding for months.
Shares — Long & Short
The trigger: price reaches the stop printed on the card. There is nothing to interpret. Shares have no expiration to rescue you and no structure to repair — the stop is the defense, and it was set when you were calm.
Take the stop
It was the plan. Execute it.
Sell a covered call against it
If you're long, willing to hold, and the name is still fundamentally fine, selling a call collects premium while you wait for recovery. It caps your upside — that's the trade.
Never lower a stop, never average down a broken chart
Moving a stop is not a defense; it is a decision to lose more money, made at the exact moment you are least able to think clearly. Averaging down is the same decision with size attached. The stop exists so that this choice is already made.
The Whole Page In Four Lines
| # | Rule |
|---|---|
| 01 | Closing is a defense. It always works, costs the least, and requires no skill or forecast. |
| 02 | Adjust to reduce risk, never to avoid a loss. If the fix raises your maximum loss, it is not a fix. |
| 03 | Only ever adjust for a credit. Paying to stay in a loser is the tell that you've stopped trading and started hoping. |
| 04 | Never break a spread apart. Removing a long leg turns defined risk into unlimited risk. This is the one that ends accounts. |
The snapshot version of this page lives on the Tape under Defending A Trade — one card per structure, for when you need the answer in ten seconds rather than ten minutes.
Educational only
Nothing here is a recommendation to place, adjust or close any particular trade. These are the mechanics of common defensive adjustments and the house defaults we use. Your account and your decisions are yours — and every adjustment here is for paper (simulated) practice and education only, never real money.
Alt Data & Context
Most of the Tape gives you trade ideas. This group gives you context — what futures, Wall Street, insiders, Congress, the big funds and the options market are positioned for. None of it is an entry trigger. All of it answers one question: should I press this trade harder, or lighter, than I otherwise would?
The rule for every board on this page
Context can raise or lower your conviction on a setup you already have. It can never create a setup. If the five indicators say CHOP, no amount of insider buying, analyst upgrades or Reddit noise makes it a trade. Chart first, context second — never the reverse.
How Context Should Change Your Size
| What you find | What to do |
|---|---|
| Your setup and two or more context boards agree | This is your A+ case. Normal size, or your upper end if the structure is defined-risk. |
| Your setup fires, context is silent | Trade it normally. Silence is not disagreement — most names have no alt-data clue at all. |
| Your setup fires, context disagrees | Half size, or skip. Something is positioned against you and you don't know what they know. |
| Context looks great, no setup | No trade. Put it on the watchlist and wait for the chart. |
Desk Confluence
What it is: the shortest list on the Tape. Six independent boards — Vertical Spreads, Options Flow, Analyst moves, Insider buys/sells, Congress trades and Squeeze Watch — are checked against each other, and a name appears only when two or more agree on the same direction without knowing about each other.
What it is not: a command to trade. Agreement between systems is not the same as being right. It tells you where to spend your research time first.
How to use it
Start your session here. If you only have time to look at one board, this is the one — then go to Vertical Spreads to see if there's a structure worth taking on those names.
Futures Bias
What it is: directional bias for the major index and commodity futures across three timeframes — 1H, 4H and Day — read through their liquid proxies. When all three agree, the bias is strong.
What it is not: scalp triggers. This is a risk-on / risk-off temperature check, not an execution tool.
How it changes conviction: if you're taking a bullish equity setup while futures bias is BEAR on all three timeframes, you're swimming upstream. That's a half-size trade at most. When futures and your setup point the same way, the whole market is behind you.
Analyst Ranks
What it is: where the analyst community sits on the most-watched names — consensus rating, recent upgrade/downgrade drift, and average price target. Updated daily.
What it is not: gospel. Analysts lag and they herd. A price target is a marketing document as much as a forecast, and downgrades often arrive after the fall.
The part that's actually useful is the drift — the direction of recent revisions. A name being quietly upgraded three times in a month is more informative than any single target number.
Social Buzz
What it is: Reddit / r/wallstreetbets mention volume with 24-hour momentum, plus real merger & acquisition 8-K filings pulled from SEC EDGAR.
What it is not: a buy trigger. Buzz is attention, and attention cuts both ways — a name can be trending because it's ripping or because it just collapsed.
Where buzz genuinely matters: volatility, not direction
A spike in retail attention usually means implied volatility is about to be expensive. That's a reason to sell premium rather than buy it — check the IVR before you decide the structure. Buzz tells you the option is pricey; it does not tell you which way the stock goes.
Insider Trades
What it is: notable open-market transactions by company officers, directors and large holders, from SEC Form 4 filings.
The asymmetry you must know: insider buys carry far more weight than sells. There is exactly one reason to buy your own company's stock with your own money. There are a dozen innocent reasons to sell — a house, a tax bill, a scheduled 10b5-1 plan, diversification.
How to use it: a cluster of open-market buys by multiple insiders is a genuine conviction tell. One routine sale is noise. Weight buys, largely ignore sells.
Congress Trades
What it is: stock trades disclosed by U.S. Senators under the STOCK Act, pulled from the official Senate disclosure system.
The limitation is the whole story: disclosures lag the actual trade by up to 45 days. By the time you see it, the move has usually happened.
How to use it: as a thematic hint, not a trade. Repeated filings across a sector can flag where policy attention is heading. Never chase an individual filing — you are, by definition, six weeks late.
Big Money Bets & Fresh Whale Moves
These two boards show the same managers — Burry, Ackman, Druckenmiller, Tepper and the rest — on two very different clocks. Knowing which you're looking at matters more than the positions themselves.
Big Money Bets — quarterly, badly lagged
The largest disclosed call and put option positions from 13F filings. These are up to 45 days stale and only filed four times a year. A giant put stack is a bet against a name — but it may have been closed months ago. Treat as narrative, not position data.
Fresh Whale Moves — days, not quarters
Open-market buys, sells and new or increased 5%+ stakes, each stamped with the date it posted. These land within days of the actual move, which makes them the far more actionable of the two.
A famous name is not a thesis
These managers run different books, different time horizons and different hedges than you. A put position you can see may be one leg of a structure you cannot. Never copy a whale position into a two-week spread.
Squeeze Watch
What it is: names with the highest short interest and days-to-cover — the raw fuel a short squeeze needs.
What it is not: a live feed. Short interest is exchange-reported only twice a month, with a delay. This is a lagged watchlist.
The trap: high short interest is usually high for a reason. Most heavily shorted stocks keep falling — that's why they're shorted. A squeeze needs a catalyst plus the crowded short, and this board only shows you the second half. Never buy a name because it's heavily shorted; only note that if it turns, the turn could be violent.
Gamma Squeeze
What it is: the options open-interest structure on the most heavily-optioned names. The call wall is the strike with the heaviest call open interest — an upside magnet where dealers are short gamma and must buy stock as it rises. The put wall is the equivalent support below.
How it actually helps you: not as a trigger, but as strike selection. Walls behave like magnets and speed bumps:
| Situation | What the wall suggests |
|---|---|
| Selling a bear call spread | Place your short strike at or above the call wall — price tends to stall there. |
| Selling a bull put spread | Place your short strike at or below the put wall — it acts as support. |
| Buying a call spread | Don't set your target above the call wall. That's where the move usually runs out of fuel. |
HM5 Credit / Debit List (HVR)
What it is: the full 142-name HM5 Universe ranked by HVR — where each name's volatility currently sits inside its own 52-week range. It's our read on IV Rank.
This is the board that picks your structure, and it is the step most beginners skip:
| HVR | Volatility is | So you |
|---|---|---|
| Above 50 | Expensive vs its own history | Sell premium — bull put / bear call spreads, condors, CSPs, covered calls |
| Below 30 | Cheap vs its own history | Buy premium — debit spreads, defined-risk directional plays |
| 30–50 | Middling | Either works. Let the chart and your comfort decide. |
The direction comes from the indicators. The structure comes from here. Getting these the wrong way round — buying premium when it's expensive — is one of the most common and most expensive beginner mistakes.
Crypto Desk
What it is: a live read on the whole coin market, with a bubble map where bigger bubble means bigger 24-hour move.
Why it's on an equities page: crypto trades 24/7 and often moves before stocks do. It's an early gut-check on risk appetite — if Bitcoin sold off hard overnight, risk-on equity setups deserve more skepticism at the open.
Trader Shorthand
What it is: every abbreviation used anywhere on the Tape, in plain English. Anywhere a term is underlined with dots on the Tape, you can hover it for the meaning.
How to use it: skim it once, properly, before your first session. Ten minutes there makes every other board on the page readable, and it's the single highest-return page for a new member.
The Whole Group In Three Lines
| # | Rule |
|---|---|
| 01 | Context adjusts size, never creates trades. The chart and the indicators decide whether there's a trade at all. |
| 02 | Know each board's clock. Whale Moves are days old, 13Fs are 45 days old, short interest is two weeks old, Congress filings are six weeks old. Staleness changes everything. |
| 03 | Two boards agreeing beats one board shouting. That's the entire idea behind Desk Confluence. |
Educational only
Every board described here is a screen over public data. None of it is a recommendation, and much of it is reported with a delay that is stated on the board itself. Read the timestamp before you read the trigger.
Credit Spreads
A credit spread is a wheel-style premium collection trade with defined maximum loss. You sell one option and buy a cheaper one further OTM to cap your risk. You collect a net credit. You keep that credit if the stock stays on the right side of your short strike at expiry. This is the primary trade structure of the Tradedesk options system.
Bull Put Spread (Credit)
Sell an OTM put. Buy a further OTM put as protection. Net credit collected. Profits if price stays above the short put strike. Used when: TREND BULL, IVR > 50%, BUY DIP or CONFLUENCE BUY trigger fires.
Bear Call Spread (Credit)
Sell an OTM call. Buy a further OTM call as protection. Net credit collected. Profits if price stays below the short call strike. Used when: TREND BEAR, IVR > 50%, SELL RIP or CONFLUENCE SELL trigger fires.
Anatomy of a Bull Put Spread
Reading the Tradedesk for Credit Spreads
| Indicator Read | Credit Spread Action |
|---|---|
| TREND BULL + IVR > 50% | Sell bull put spread. Full confirmation. Size at your standard unit. |
| CONFLUENCE BUY | Sell bull put spread immediately. Highest conviction entry. FLOW + HM5 aligned. Use this bar's close as your reference. |
| BUY DIP + FLOW TREND BULL | Sell bull put spread at the dip. Put your short strike below the dip low. Let the bounce work for you. |
| GRID: HOLDING BULL | Hold existing bull put spread. Theta is working. No adjustment needed unless trend changes. |
| TREND BEAR + IVR > 50% | Sell bear call spread. Mirror setup. Short strike above the rip high. |
| CONFLUENCE SELL | Sell bear call spread immediately. Strongest short trigger. FLOW bear + HM5 aligned. |
| CHOP on any dashboard | No new spreads. Manage existing. Chop eats credit spreads alive — you get tested from both sides. |
| EXIT LONG dot fires against spread | Close the spread early. Take whatever you've got — up to your 25% target. Don't give it back. The Exit Dot is real. |
Strike Selection — The 1× EXP Rule
Your short strike must be at least 1× EXP away from current price. The EXP pill on Pulse gives you the market's own estimate of the expected move. Selling inside EXP = selling in the expected zone = lower probability. Selling outside EXP = selling beyond the expected move = higher probability of expiring worthless.
Bull Put Spread — Chart Read + Order Setup
Here is what an A+ credit spread setup looks like. SOXL shows all five indicators aligned bullish, IVR at 91% (historically expensive premium), and Tide showing an TREND BULL SURGE. This is the highest-conviction environment for selling a bull put spread.
✅ What You're Seeing — SOXL Full Bull Alignment
4H: TREND BULL · GRID: HOLDING BULL · STRENGTH 74 · ACCEL + — green candles above all three EMAs. The fast cyan EMA is rising above the slow yellow EMA, both above the gray big EMA. BUY DIP and BREAKOUT arrows visible on chart.
1D: STRENGTH 83 · IVR 91% · BUY 96% / SELL 4% — the daily chart is in full bull stride. IVR at 91% is the key — premium is near its 52-week highs. Every bull put spread you sell here collects above-average income.
1W: TREND BULL SURGE (272% of 30-week average) — institutional volume is more than double normal. Weekly trend firmly bull. This is the fuel driving the move. STRENGTH 102 is above the +100 maximum — extreme conviction.
How to Set Up the Bull Put Spread
📋 What This Order Actually Means — Bull Put Spread on SOXL
⚠️ What Those Red Warnings on the Ticket Actually Mean
Debit Spreads
When IVR is low, buying options outright is cheap — but you pay theta every day. A debit spread solves this. You buy an ATM or slightly OTM option for direction, and sell a further OTM option to offset the cost and reduce theta drag. You pay a net debit. You profit when price moves to your long strike. Maximum loss is the premium paid. Maximum gain is the spread width minus the debit.
Bull Call Spread (Debit)
Buy an ATM or slightly OTM call. Sell a further OTM call to reduce cost. Net debit paid. Profits when price rises above the long strike. Used when: TREND BULL, IVR < 50%, BREAKOUT or CONFLUENCE BUY fires with strong momentum.
Bear Put Spread (Debit)
Buy an ATM or slightly OTM put. Sell a further OTM put to reduce cost. Net debit paid. Profits when price falls below the long strike. Used when: TREND BEAR, IVR < 50%, BREAKDOWN or CONFLUENCE SELL fires with strong momentum.
Anatomy of a Bull Call Spread
Reading the Tradedesk for Debit Spreads
| Trigger Combo | Debit Spread Action | Notes |
|---|---|---|
| BREAKOUT + IVR < 50% | Buy bull call spread | Price breaking range on volume. Low IV = cheap debit. Strong momentum = fast move to target. |
| CONFLUENCE BUY + Pulse STRENGTH > +60 | Buy bull call spread — size up | Highest conviction. FLOW + HM5 + strong Pulse = the stack is all-in. This is an A+ debit entry. |
| BUY DIP + ACCEL UP on FLOW | Buy bull call spread at the dip reclaim | Dip absorbed with acceleration. Debit spread captures the bounce with defined risk. |
| SQZ FIRED in bull regime | Buy bull call spread immediately | Squeeze release = volatility expansion. Buy before IV rises further. Take the break direction. |
| BREAKDOWN + IVR < 50% | Buy bear put spread | Mirror of the breakout setup. Price breaking down on volume. FLOW bias must agree — BEAR. |
| CONFLUENCE SELL | Buy bear put spread — size up | Strongest short trigger. Same A+ logic applies on the short side. |
Debit vs. Credit — The IVR Decision Tree
Every morning, before picking any structure, look at the IVR pill on Pulse. This single number makes the decision for you:
| IVR Reading | Premium Environment | Preferred Structure | Tradedesk Triggers That Pair |
|---|---|---|---|
| > 50% | Expensive — sell it | Credit spreads, CSPs, Covered Calls, Wheel | Any trend trigger + TIDE TREND BULL with VOL ≥100% |
| 30–50% | Neutral — either works | Credit spreads slightly favored. Debit if BREAKOUT imminent. | SQZ FIRED = lean debit. HOLDING BULL = lean credit. |
| < 30% | Cheap — buy it | Debit spreads, long calls/puts with spread overlay | BREAKOUT, CONFLUENCE BUY/SELL, SQZ FIRED |
Bull Call Spread — Order Ticket
Tradedesk setup: TREND BULL · IVR 34% (cheap premium → buy it) · SQZ FIRED in bull regime · BREAKOUT arrow · FLOW: ACCEL UP (yellow bars) · PULSE STRENGTH > +60
📋 What This Order Actually Means — Bull Call Spread on AAPL
⚠️ What Those Red Warnings on the Ticket Actually Mean
Bear Call Spread — Chart Read + Order Setup
Here is the mirror of the bull put spread. QQQ is in a full bear regime across all timeframes — magenta candles, EMA stack inverted, FLOW bear, Tide showing TREND BEAR (VOL ≥100%). IVR at 68% means premium is elevated and worth selling. This is the environment for a bear call spread.
🔴 What You're Seeing — QQQ Full Bear Alignment
4H: TREND BEAR · SELL RIP trigger · STRENGTH −62 · ACCEL DN · TREND BEAR — magenta candles below all EMAs. SELL RIP arrows and BREAKDOWN arrows visible. The fast EMA (cyan) is below the slow EMA (yellow).
1D: TREND BEAR · STRENGTH −71 · IVR 68% · BUY 18% / SELL 82% — strong bear conviction on the daily. Only 18% of volume is buying. 82% is selling. The flow confirms the trend.
1W: TREND BEAR SURGE (184% of 30-week average) — institutional selling is running well above average. STRENGTH −55 on the weekly confirms this is not a short-term dip, it is a macro trend change.
How to Set Up the Bear Call Spread
📋 What This Order Actually Means — Bear Call Spread on QQQ
⚠️ What Those Red Warnings on the Ticket Actually Mean
Expected Move — How Far Is "Normal"?
Every stock has a normal-sized move for a given stretch of time. Some days it drifts, some days it lurches. Expected Move (EXP) is the market's own number for that — how far the stock is likely to travel, up or down, over a window. The best part: you don't calculate it. Your dashboard already shows it.
It lives on the Pulse pane as the EXP $8.96 pill. That cyan number is the whole tool. Once you know how to use it, you'll never guess where to put a strike again.
↑ The Pulse dashboard. The cyan EXP pill is your distance number.
What EXP Tells You
How big a normal move is, in dollars. "About this far is expected." It is built from price and IV — the options market's live volatility read.
What EXP Does NOT Tell You
Direction. EXP is the size of the swing, not which way. Your Tradedesk stack (TREND, FLOW, TIDE) gives you direction. EXP gives you distance.
The 2-Out-Of-3 Band
Take today's price and add EXP for the ceiling, subtract it for the floor. The stock finishes inside that band about two-thirds of the time — roughly 2 weeks out of 3. Going outside it is the rarer 1-in-3 event. That band is the heart of every spread you place.
The Multiplier — Stretch EXP For Your Hold
EXP is one day. But you don't hold a credit spread for one day — you hold it for a week, two weeks, a month. The longer you hold, the more room the stock has to wander. So you multiply EXP by a number based on how many days you're in the trade.
Here's the only thing that surprises people: a 25-day move is not 25× a one-day move. It's only about 5×. Moves don't pile up in a straight line — markets spread out slower than time passes. The multiplier is just the square root of the days (√). You never have to do that math, though. Use the table.
The Cheat Sheet — DTE to Multiplier
| Days Held (DTE) | × Multiplier | Typical Trade |
|---|---|---|
| 1 | 1.0 | 0DTE / same-day play |
| 3 | 1.7 | Weeklies (Mon → Friday) |
| 5 | 2.2 | — |
| 7 | 2.6 | One week out |
| 10 | 3.2 | — |
| 14 | 3.7 | Two weeks out |
| 21 | 4.6 | Credit spread range (start) |
| 30 | 5.5 | Credit spread sweet spot |
| 36 | 6.0 | — |
| 45 | 6.7 | Credit spread range (end) |
Setting Your Strike — Put It Past The Line
Now you put the two pieces together. EXP from page one, the multiplier from page two, and three simple steps. This is the same idea as the 1× EXP Rule in the Credit Spreads tab — just done properly for however long you actually hold.
Call spread: sell above the line. • Put spread: flip the sign (price − EXP×mult) and sell below.
Worked Example — ADBE at 237.88, EXP $8.96
| Hold | The Math | Your Line | Sell Call Above |
|---|---|---|---|
| 3 days | 237.88 + (8.96 × 1.7) | ~253 | 253 |
| 10 days | 237.88 + (8.96 × 3.2) | ~267 | 267 |
| 25 days | 237.88 + (8.96 × 5.0) | ~283 | 283 |
| 45 days | 237.88 + (8.96 × 6.7) | ~298 | 298 |
Notice the line walks further out the longer you hold — same stock, same EXP, just more time for it to move. A 3-day spread sells at 253; a 45-day spread can sell all the way out at 298 and still be "outside normal."
Find the line. Sell past it.
That's expected move in one sentence.
The line is a guide, not a wall — price can still cross it. That's why you size small and respect your stops.
HM5 Scanners — Options Edition
The scanners are your hunters. They surface candidates for spreads and wheel trades before you open a chart. A scanner result means: look here. The indicators confirm: act here. Never confuse those two things.
Macro direction · Institutional flow · Stable trend environments · Premium selling
Credit spreads · Wheel candidates · Covered call writing · CSP income plays
Best Used: Premarket · Late day · Mondays · Thursdays
Personality: The calm veteran options seller. Not chasing. Not guessing. Positioning for premium with structure behind it.
Establish directional bias · Locate continuation structure · Build your wheel watchlist
Wheel candidate screening · Bull put spread candidates · Covered call underlying selection
Best Used: Premarket · Midday · Power hour
Personality: Your map. It tells you where the road actually goes — before you bet your premium on it.
Primary setup engine · Momentum continuation · High beta expansion
Debit spreads · Aggressive continuation calls/puts · Short-dated momentum plays
Best Used: 8:00 AM – 10:00 AM MT · Tuesdays · Thursdays
Personality: This scanner drinks espresso and breaks resistance levels. It finds the debit spread setups.
Detect exhaustion · Spot reversals · Locate hidden accumulation/distribution
Bear call spread candidates · Reclaim buy spread setups · Trap reversal entries
Best Used: Wednesdays · Midday · After major runs
Personality: This scanner sees lies. If price is ripping but flow is bleeding, this finds it first.
Detect squeeze releases · Volatility expansion · Early acceleration
Debit spreads before IV rise · Long straddle territory · Momentum debit plays
Best Used: 7:30 AM – 10:00 AM MT · Tuesdays · Thursdays · After consolidations
Personality: A coiled spring. The debit spread buyer's best friend. Buy the spread before SQZ FIRES — not after.
Opening momentum discovery · Institutional drive detection · Fast continuation
0DTE or short-dated debit spreads · Fast directional calls/puts · Open momentum plays
Best Used: 7:30 AM – 8:30 AM MT · Tuesdays · Fridays
Personality: Kicks the market door open. You are NOT holding these options overnight. These are fast, defined-risk, in-and-out plays.
Reading the Tradedesk Together
The whole point of running five indicators is confluence. A real spread trade is one where all five agree at the same bar. Walk down your screen before every entry:
- Trigger — Direction. Arrow fired? Which trigger type? Is speed/mode correct for your timeframe?
- Pulse — Structure. IVR above or below 50%? STRENGTH past ±50? SQZ state?
- Flow — Truth. BIAS on your side? No opposite divergence dot in the last 2 bars?
- Grid — Structure. GRID BUY or HOLDING BULL? Not WAIT or EXIT?
- Tide — Size. WK% above 100%? a green or yellow VOL pill on your side?
If all five answers are yes, take it. If two or more are no, you don't have a spread — you have a hope trade.
The A+ Options Setups
A+ #1 — The Triple-Confirm Breakout Spread
The yellow BREAKOUT arrow is "triple-confirmed" by TRIGGER itself — it only fires when price closes above the prior range high, volume is above average, AND ATR is expanding. On top of that the stack agrees: Pulse STRENGTH above +60 with a yellow breakout dot, Flow prints a yellow ACCEL UP bar, Grid prints GRID: BUY, and Tide is TREND BULL or TREND BULL SURGE.
Sell a bull put spread below the breakout candle's low. Width = 1× EXP or ATR. Collect credit. Target: full premium decay. Exit trigger: EXIT LONG dot or trend reversal.
Buy a bull call spread. Long strike at or slightly above the breakout close. Short strike 1× EXP above that. Take profit when you're satisfied or on the Exit Dot — your call. Do not hold debit spreads to expiry.
A+ #2 — The Dip Buy Spread (CVD Absorption)
Trend is BULL on all dashboards. Price pulls back to the fast EMA. Trigger fires a lime BUY DIP arrow. Flow shows a cyan divergence dot and BIAS flips back to BULL. Pulse STRENGTH curling up off the zero line.
Sell a bull put spread — short strike below the dip low, width = 1× EXP. This is the ideal wheel CSP entry too: cash-secured put at or below the dip low.
Buy a bull call spread — long strike at or just above the dip reclaim close. The divergence dot confirms buyers absorbed the dip. Catch the bounce with defined risk.
A+ #3 — Confluence Buy/Sell Spread (Highest Priority)
Trigger fires a cyan CONFLUENCE BUY or deep-orange CONFLUENCE SELL arrow. FLOW CVD and the HM5 Exit Dot are both aligned simultaneously. This is the desk's single strongest trigger. Grid is HOLDING BULL. Pulse STRENGTH is rising.
Regardless of IVR — this trigger justifies either structure. IVR > 50%: sell a credit spread, size up. IVR < 50%: buy a debit spread, size up. Do not hesitate on this trigger — it is the most filtered entry in the entire stack. Stop below the bar's low (for bull) or above bar's high (for bear).
A+ #4 — Trap Reversal Spread
A breakout fires against the macro trend, then immediately fails. Pulse drops a cyan (Trap Long) or red (Trap Short) dot. Flow shows opposite-color absorption. The next candle closes back through the midpoint of the trap bar.
Enter a credit spread in the reversal direction. If Trap Short (red): sell bear call spread above the failed breakout high. If Trap Long (cyan): sell bull put spread below the failed breakdown low. These move fast — take 50% profit quickly, trail the rest. Max loss is the spread width.
Complete Daily Schedule — Options Edition
The market opens at 7:30 AM MT (9:30 AM ET) and closes at 2:00 PM MT (4:00 PM ET). Not all hours are equal for options traders. This schedule shows which structure fits each day, when premium is worth entering, and when to keep your hands in your pockets.
Scanners: HM WEEKLY CREDIT · HM DAILY TREND | Indicators: TIDE · GRID · PULSE (check IVR)
- Check IVR across your watchlist — decide credit vs. debit bias for the day before the open.
- Check TIDE — heavy-flow week means larger spread size. Thin tape = half size all day.
- Use HM DAILY TREND to confirm structure. Choppy = stand aside that name, no wheel entries.
- Mark EXP for your top 3–5 names. Know your strike levels BEFORE the open.
- Set your max loss for the day BEFORE you see the first candle.
Scanners: HM 4H HIGH BETA · HM SQUEEZE EXPANSION 1H | Indicators: TRIGGER (mode/speed set) · PULSE (check SQZ)
- Confirm your top 3–5 names. Drop the rest. Spread traders need focus, not quantity.
- Look for SQZ ON in PULSE. Squeeze candidates are your A+ debit spread plays at the open.
- Identify your exact strike prices using EXP pill — already done from premarket.
- Decide: which names are credit plays (IVR > 50%) and which are debit plays (IVR < 50%).
Scanners: HM OPEN DRIVE 5M | Indicators: TRIGGER · FLOW · PULSE
- Wait for BREAKOUT, RECLAIM BUY, or CONFLUENCE BUY before any debit spread entry at the open.
- FLOW must confirm — TREND BULL + ACCEL UP for call spreads. TREND BEAR + ACCEL DN for put spreads.
- PULSE STRENGTH past ±40 minimum. Gray bars = no spread entry.
- These are fast plays. Short DTE (0–7 days). Have your exit price before you enter. Do not hold through lunch.
Scanners: HM 4H HIGH BETA · HM SQUEEZE EXPANSION 1H | Indicators: TRIGGER · FLOW · PULSE · GRID · TIDE
- WEEKLY (TIDE) aligned + DAILY (GRID) aligned + 4H FLOW accelerating = A+ spread conditions.
- GRID must show HOLDING BULL (or BEAR). GRID: WAIT = no new spread entries.
- PULSE STRENGTH above +50 for bull spreads, below –50 for bear spreads.
- TRIGGER must fire CONFLUENCE BUY, BREAKOUT, or RECLAIM BUY for bull credit/debit entries.
- Credit spreads with 21–30 DTE are prime here. Debit spreads 7–14 DTE. Time is money.
Scanners: HM FLOW DIVERGENCE 4H | Indicators: FLOW (watch for divergence) · GRID
- Manage open winners — take up to 25% of the credit on credit spreads if available. Never give back a winner.
- Use HM FLOW DIVERGENCE 4H to spot exhaustion in existing credit spread positions.
- If GRID flips to WAIT, evaluate all open bull spreads and CSPs for early close or roll.
- Bear divergence dot (red) in midday on a bull spread position = consider closing early.
Scanners: HM DAILY TREND · HM WEEKLY CREDIT | Indicators: TIDE · FLOW
- Watch TIDE — if weekly volume is surging into close, institutional repositioning is real. Credit spread opportunities are highest conviction here.
- FLOW BIAS shift late in the day can point to an overnight trend change — adjust open wheel positions accordingly.
- Best for new credit spread entries with 21–45 DTE — collect premium into a confirmed close-of-day trend.
- Close all 0DTE and short-dated day-trade spreads by 1:50 PM MT. Do not hold 0DTE into the final 10 minutes.
Day-by-Day Personality
| Day | Vibe | Options Approach | Best Scanners |
|---|---|---|---|
| MONDAY | The market is waking up. Fresh rotations, new leaders, macro direction establishing. | Credit spreads and new CSP entries on names with confirmed DAILY trend. Lighter size. Wait for the trend to establish. | HM WEEKLY CREDIT · HM DAILY TREND |
| TUESDAY | Momentum day. Continuation from Monday's rotations. Squeeze setups fire. Aggression: HIGH. | Debit spreads on SQZ FIRED names. Bull call spreads on BREAKOUT triggers. Prime day for short-dated directional plays. | HM OPEN DRIVE 5M · HM 4H HIGH BETA · HM SQUEEZE EXPANSION 1H |
| WEDNESDAY | Reset day. The market traps traders. Reclaims, reversals, failed breakouts. | Look for Trap Reversal spreads. Bear call spreads on exhausted runs. FLOW DIVERGENCE is your primary entry filter today. | HM FLOW DIVERGENCE 4H · HM SQUEEZE EXPANSION 1H |
| THURSDAY | Continuation day. Strong names keep running. Weak names accelerate down. Aggression: HIGH. | Roll profitable CSPs up and out. Add new credit spreads on trending names. Best day for 7–14 DTE debit spreads on momentum continuations. | HM 4H HIGH BETA · HM DAILY TREND · HM SQUEEZE EXPANSION 1H |
| FRIDAY | Protect your week. Aggressive in morning. Very careful in afternoon. No new overnight risk. | Morning: fast debit spreads if BREAKOUT fires cleanly. Afternoon: close all short-dated spreads. Do NOT carry speculative positions into the weekend. Collect any remaining theta on credit spreads Monday. | HM OPEN DRIVE 5M · HM DAILY TREND |
When to Use Each Structure
| Use CREDIT SPREADS When: | Use DEBIT SPREADS When: | Use THE WHEEL When: |
|---|---|---|
Scanners: HM WEEKLY CREDIT · HM DAILY TREND Avoid during: squeeze fires, earnings, violent expansion days |
Scanners: HM 4H HIGH BETA · HM SQUEEZE EXPANSION 1H · HM OPEN DRIVE 5M |
Scanners: HM WEEKLY CREDIT · HM DAILY TREND Never wheel a stock you wouldn't hold for months if assigned |
Skip This Spread Unless...
If you can't check off at least four of these boxes, the spread isn't A+ — pass. The premium will still be there tomorrow.
Audio Cues Mapped to Options Actions
Every indicator fires audio cues on bar close. Here is what each cue means for your options workflow. Right-click any indicator, open its sound settings, and toggle on what you want.
| Indicator | Cue | Options Action |
|---|---|---|
| TRIGGER | CONFLUENCE BUY | Sell bull put spread or buy bull call spread immediately. Highest conviction. |
| TRIGGER | CONFLUENCE SELL | Sell bear call spread or buy bear put spread immediately. |
| TRIGGER | BREAKOUT — BUY | Sell bull put spread below breakout low. Or buy bull call spread at close. |
| TRIGGER | BREAKDOWN — SELL | Sell bear call spread above breakdown high. Or buy bear put spread at close. |
| TRIGGER | BUY THE DIP | New CSP or bull put spread. Short strike below dip low. Wheel entry. |
| TRIGGER | EXIT LONG — CLOSE | Close or roll bull spreads. Take covered call profit. Evaluate CSP assignment risk. |
| TRIGGER | TRAP SHORT / LONG | Reversal spread in the trap direction. Fast, defined-risk entry. |
| PULSE | SQZ FIRED — BUY | Buy bull call spread NOW. IV about to expand — get in before the premium rises. |
| PULSE | SQZ FIRED — SELL | Buy bear put spread NOW. Squeeze breaking to the downside. |
| FLOW | BULLISH DIVERGENCE | Cyan dot at bottom. Close bear spreads. Consider bull put spread or new CSP. |
| FLOW | BEARISH DIVERGENCE | Red dot at top. Close bull spreads early. Consider bear call spread. |
| FLOW | BULL ACCELERATION | Yellow bar fired. Confirm existing bull spread. New debit call spread if IVR permits. |
| GRID | GRID — BUY TRIGGER | New CSP or bull put spread entry. EMAs stacked bull. Full confirmation. |
| GRID | GRID — MOMENTUM DOWN | Close or roll all bull spreads and CSPs. Fast EMA broke down. |
| TIDE | TREND BULL SURGE | Size up existing bull spread positions. Institutional money confirming the move. |
| TIDE | TREND BEAR SURGE | Evaluate all bull spreads for early close. Bear spreads get full size. |
Beginner Rules — Options Edition
Final Thought
The HOU5EMONEY Tradedesk is NOT about trading constantly.
It is about trading intelligently.
You are not trying to predict every move.
You are trying to find the BEST premium opportunities.
That's the difference between a professional options trader and someone paying tuition to the market.
Glossary Snapshot
Every abbreviation that appears on any Hou5eMoney dashboard or options trade, in one place.
Learn the Language. Then Paper-Trade It.
For deeper market structure, technical analysis, and options strategy, ask about the Hou5eMoney Trading Library and our live education channels, where every setup in this playbook is walked through in real time — for paper (simulated) trading and educational purposes only, never a recommendation to trade real money.
Disclaimer
- No Investment Advice; Educational Use Only. This playbook, the Hou5eMoney indicators, scripts, charts, triggers, and any related materials are provided for general educational and informational purposes only. Nothing constitutes investment, financial, legal, tax, or accounting advice. Consult a licensed professional before making any trading or investment decision.
- Risk of Loss; No Guarantee of Results. Options trading involves substantial risk, including the potential loss of all capital. Defined-risk spreads cap your maximum loss to the spread width — they do not eliminate the risk of losing 100% of capital committed. Past performance, hypothetical results, and any triggers produced by these materials are not indicative of future results. Trade only with capital you can afford to lose entirely.
- Options-Specific Risk. Options are complex instruments that expire. A spread that expires worthless results in total loss of premium paid (debit) or maximum spread-width loss (credit). Early assignment, pin risk, and liquidity risk are real and can affect even defined-risk positions.
- No Warranties. The materials are provided "AS IS" without warranty of any kind, including warranties of merchantability, fitness for a particular purpose, accuracy, or uninterrupted operation.
- Limitation of Liability. In no event shall Hou5eMoney be liable for any direct, indirect, incidental, special, consequential, or punitive damages, including lost profits or loss of capital, arising from use of or inability to use these materials.
- Intellectual Property. All materials — including the Hou5eMoney name, logos, indicator code, color systems, and this playbook — are the exclusive property of Hou5eMoney and protected by copyright, trademark, and applicable laws. No portion may be reproduced, distributed, sublicensed, reverse-engineered, or used to train any AI or derivative model without prior written consent.
- Governing Law. These terms are governed by the laws of the State of Delaware, USA.
The market speaks in color. Learn the language.